Setting up OmicsBridge
on your own computer
An easy, local installation guide.
About this guide
This is a step-by-step guide for experimentalists — not informaticians. You do not need to know R, Docker, or the command line to follow it.
Who this is for
Wet-lab researchers who want OmicsBridge running on their own Mac or Windows computer, with no bioinformatics background required.
How to use it
On the next slide, pick the one path that matches your computer and preference. Every step from there is spelled out in full — no need to read the other three paths.
Each step includes exactly what to click and what you should see, with a screenshot alongside it.
Where are you starting from?
Click the card that matches your computer and your preference. If you're not sure, "Docker" is the safer default — it needs no R knowledge.
Mac Your own R
Everything below is specific to this path — just follow along top to bottom.
1Install R
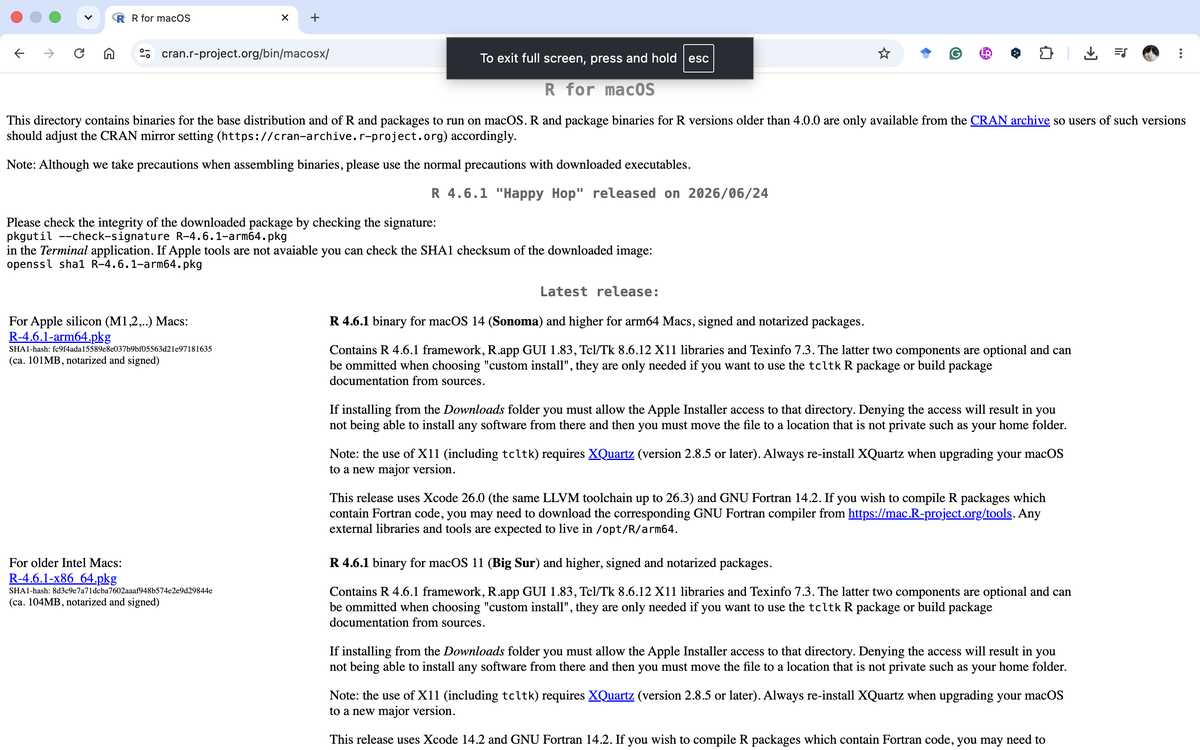
Go to cran.r-project.org/bin/macosx/ and download the latest .pkg installer (choose the Apple Silicon or Intel build matching your Mac — Apple menu → About This Mac tells you which).
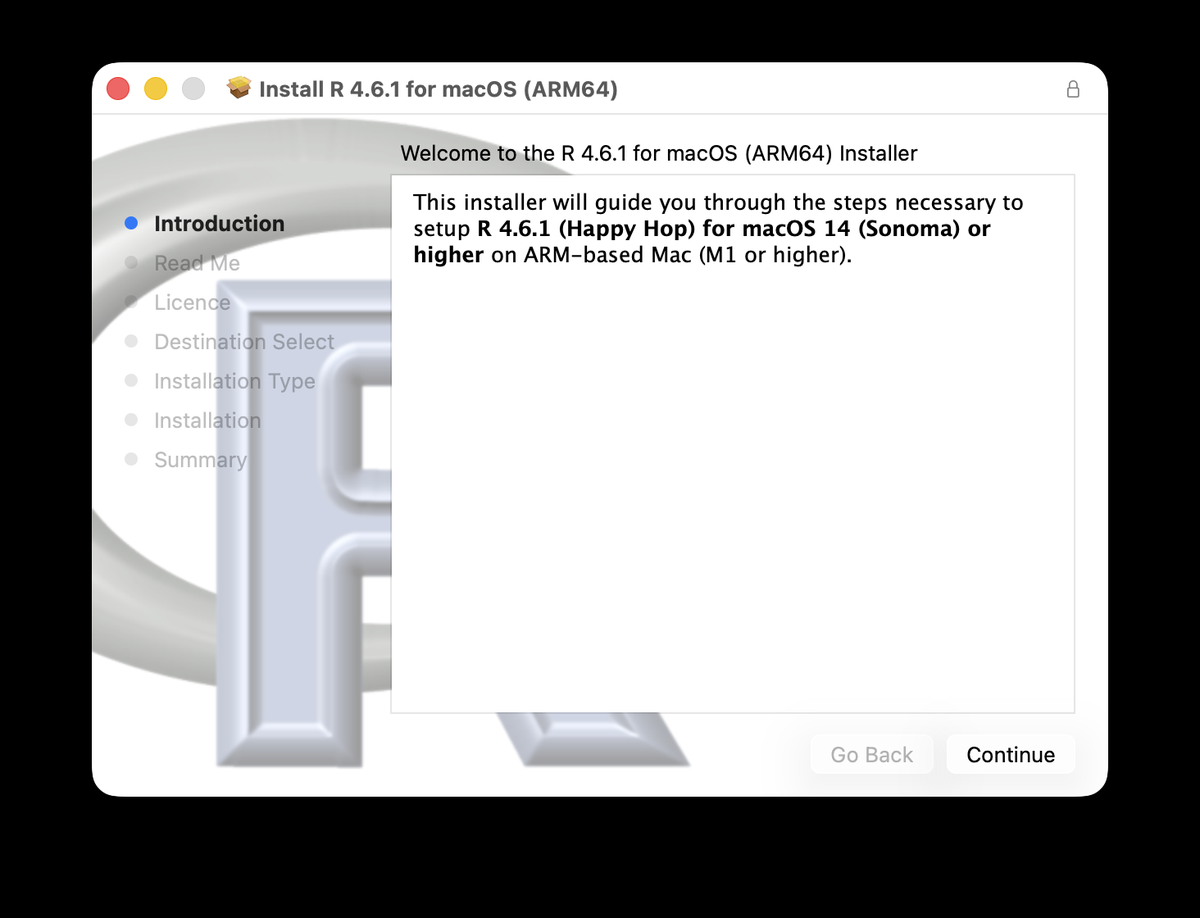
Open the downloaded file and follow the installer, same as any other Mac app.
Version 4.4.0 or higher is required. If unsure, just install the newest version offered.
2Install Xcode Command Line Tools
Some R packages need to be compiled — without this, package installation can fail partway through.
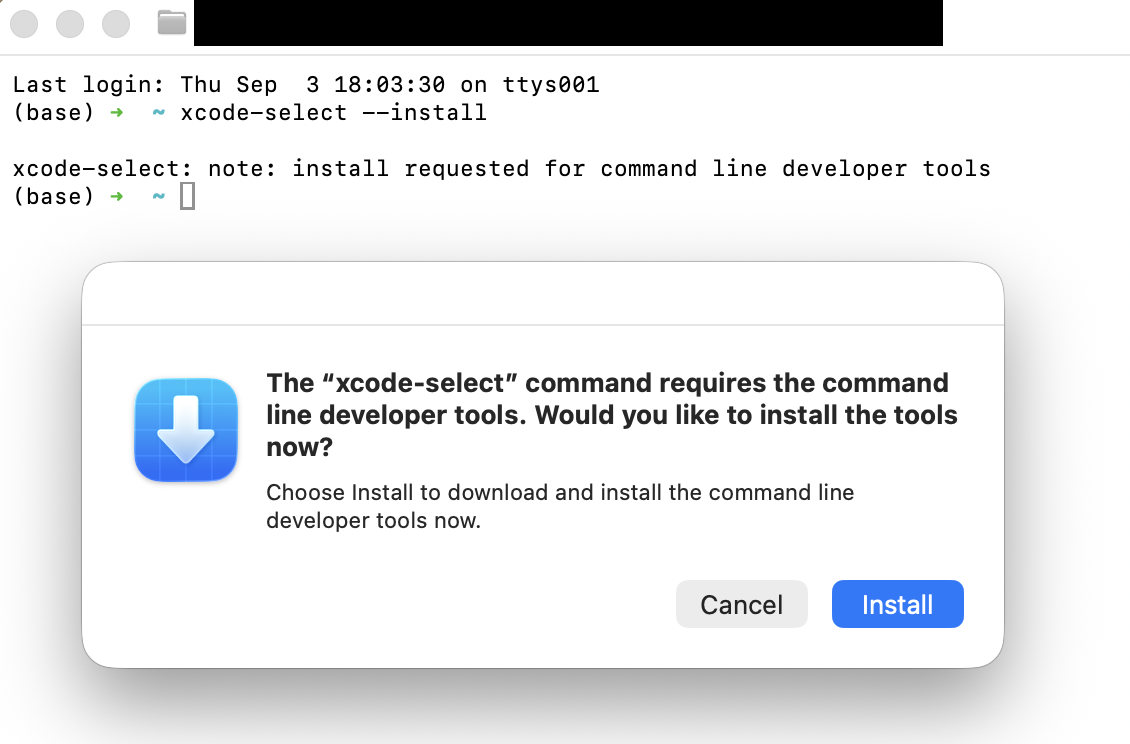
Open Terminal (⌘+Space, type Terminal, press Enter) and run:
xcode-select --installA dialog appears — click Install and wait for it to finish (a few minutes).
3Get the OmicsBridge files
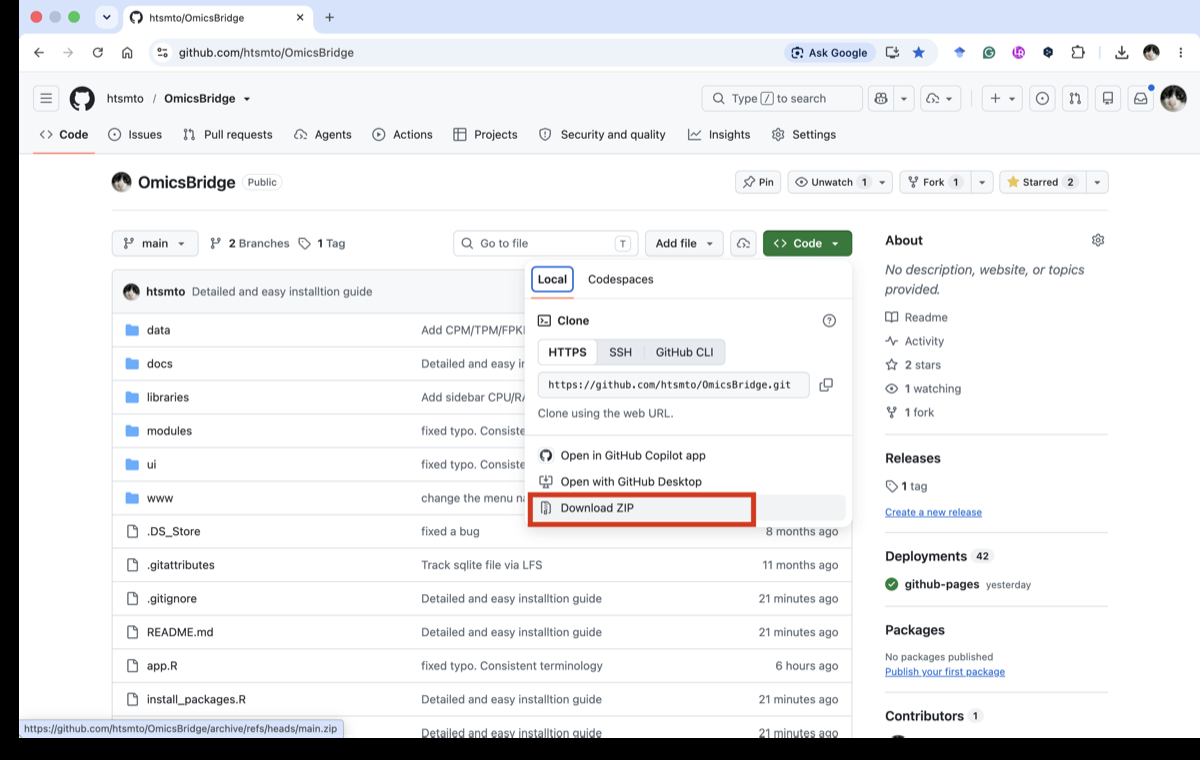
Go to github.com/htsmto/OmicsBridge, click the green Code button → Download ZIP.
Double-click the downloaded ZIP in Finder to unzip it — pick somewhere easy to find, e.g. your Desktop.
The unzipped folder is named OmicsBridge-main (not just OmicsBridge) — that's fine, no need to rename it. This guide just calls it "the OmicsBridge folder."
4Download the data
Go to the Zenodo page and download:
00_Clinical_dataset.tar.gz— curated TCGA data, required00_Expression_data_all.tar.gz— demo data, optional
00_Expression_data_all.tar.gz is demo data only, and it's large. OmicsBridge runs fine without it — skip it now and come back for it later if you want the full demo.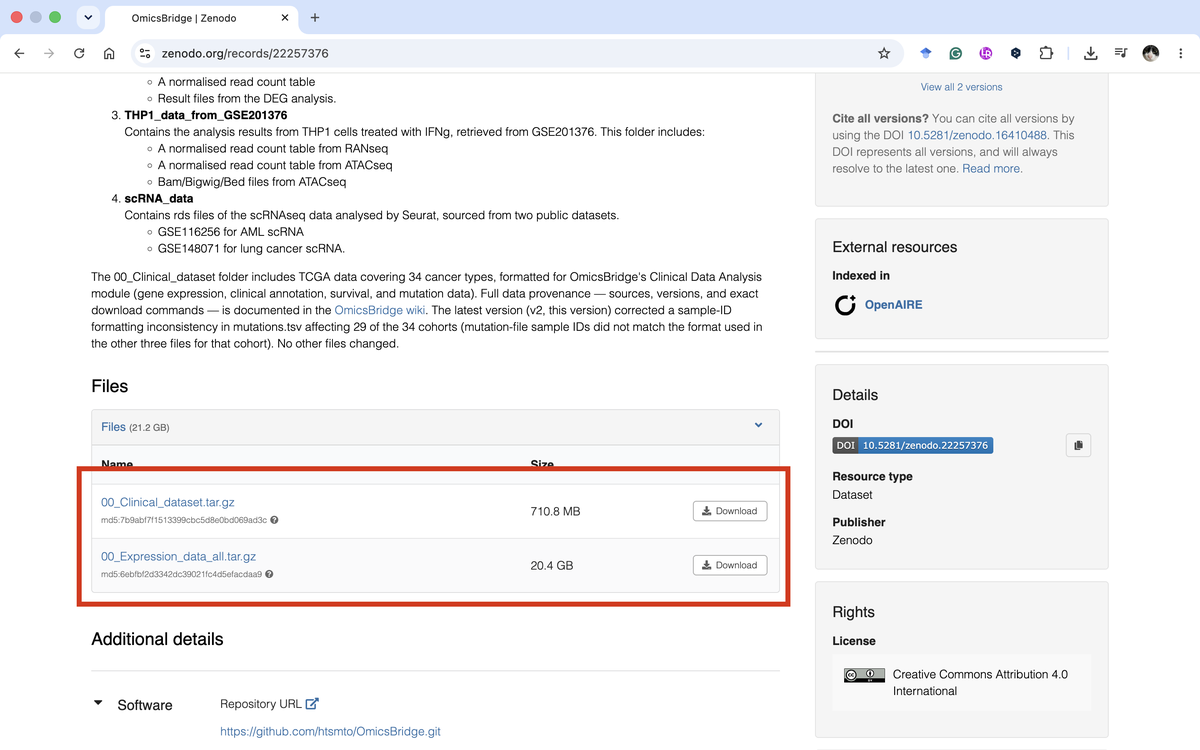
5Unzip the data into the OmicsBridge folder
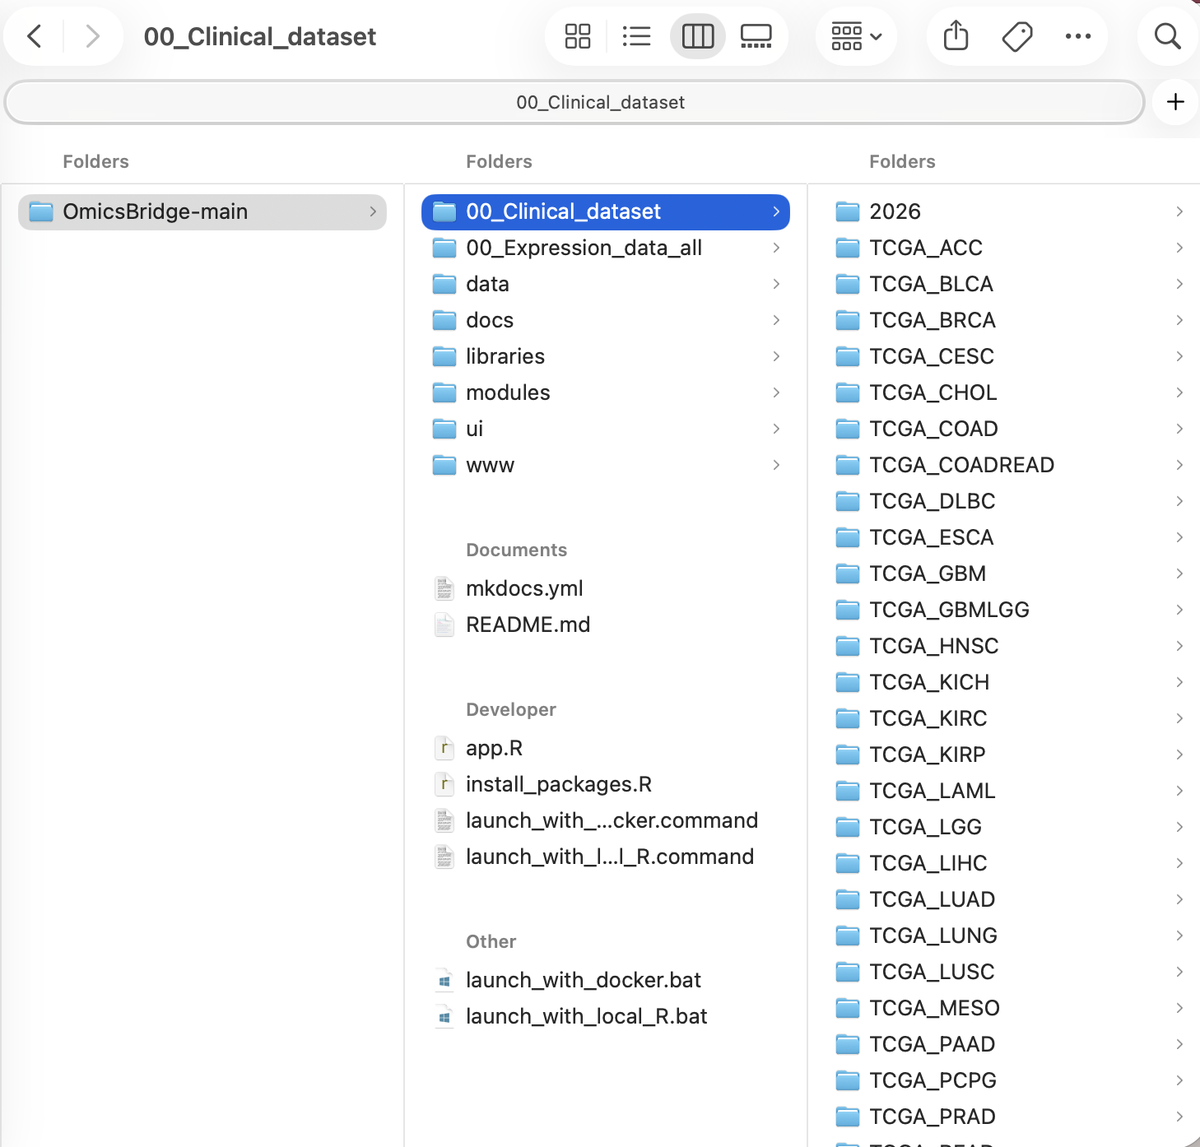
Move the downloaded .tar.gz file(s) into the OmicsBridge folder, then double-click each one — Finder unzips .tar.gz files natively on Mac, no extra software needed.
6Launch OmicsBridge
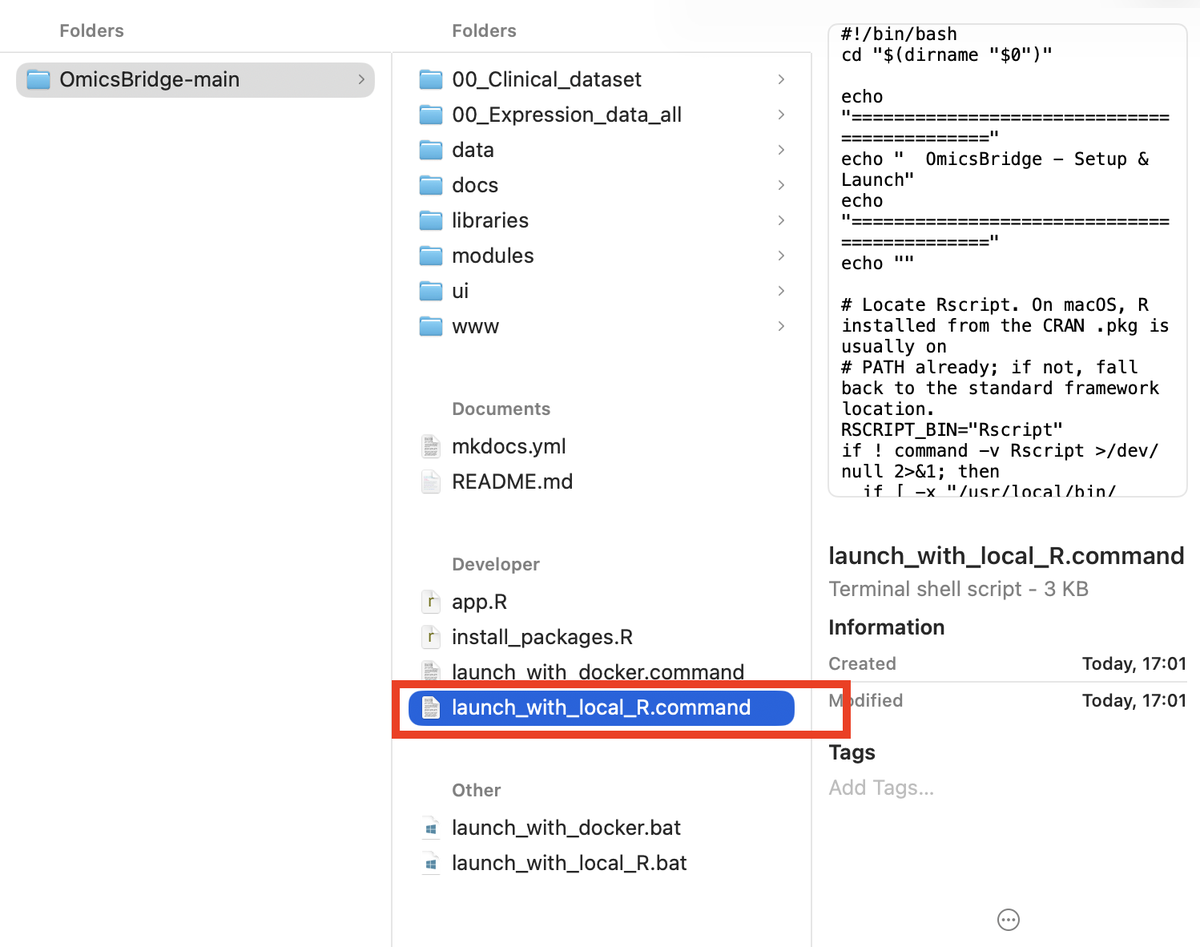
In the OmicsBridge folder, double-click launch_with_local_R.command.
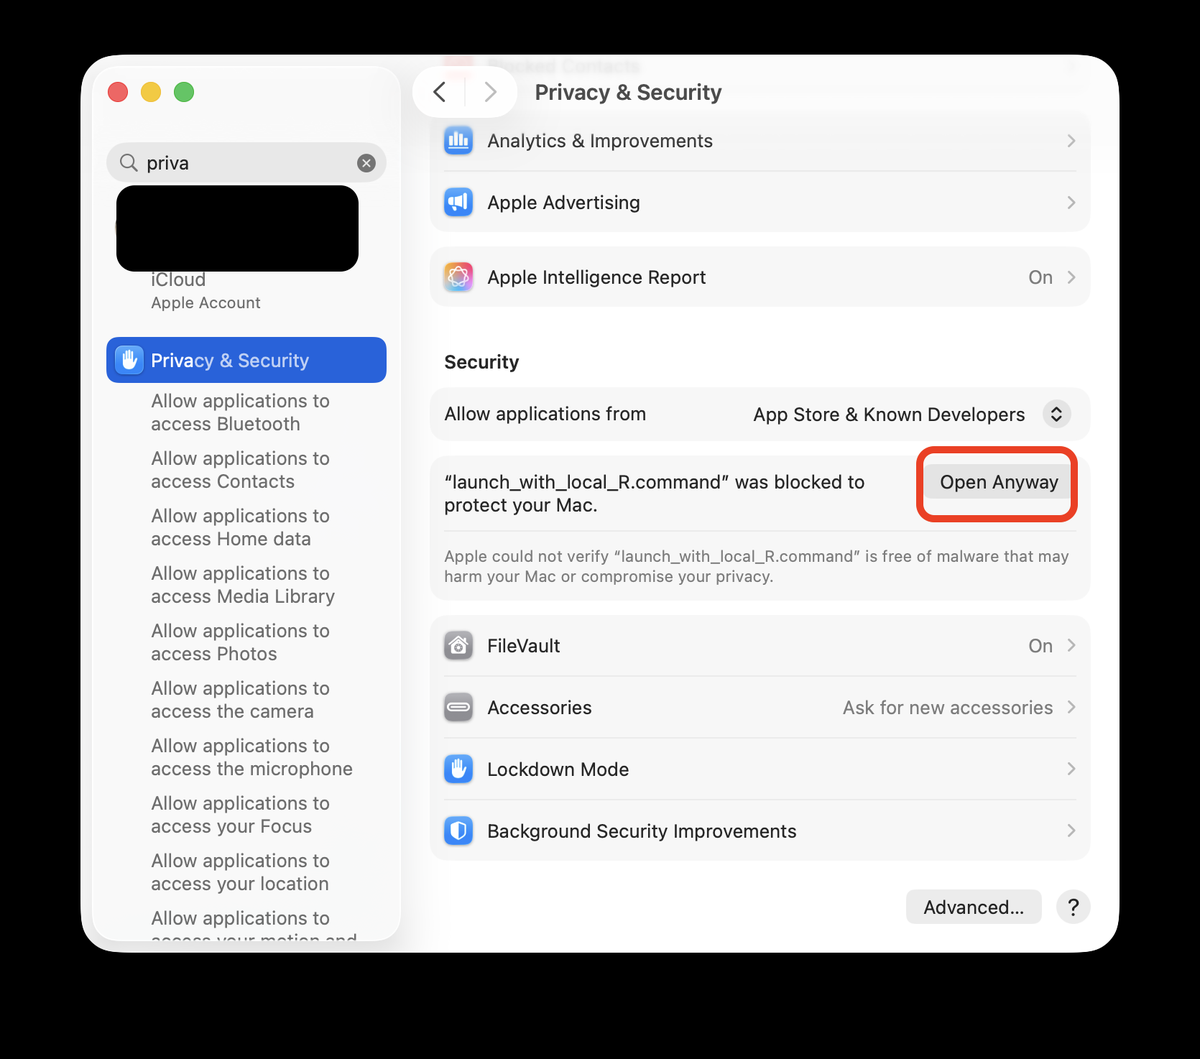
You'll likely see: "Apple could not verify 'launch_with_local_R.command' is free of malware..." Click Done (not "Move to Bin"). Try right-click the file → Open → Open first — if that doesn't work, go to System Settings → Privacy & Security, scroll down to the message about this file being blocked, and click Open Anyway (you'll be asked for your password or Touch ID). You only need to do this once.
7First run: installing packages
A black Terminal window opens and shows "Step 1/2: Installing required R packages" — this happens only the first time, and can take anywhere from several minutes up to about an hour depending on your internet connection. Leave it running.
You'll see a long scroll of package names and download messages — that's normal. Every launch after this one skips straight to starting up.
It's fine if a handful of packages fail here — OmicsBridge can often still run even with a few missing. Scroll up in the log to find the final "Installation Summary" table; any package marked FAILED can be installed separately by opening R (or RStudio) on its own and running install.packages("package_name") or BiocManager::install("package_name") for each one. This can get fiddly depending on your machine — if you get stuck, it's worth asking a bioinformatician colleague to handle just this step, or switching to the Docker-based install instead, which avoids package compilation entirely.
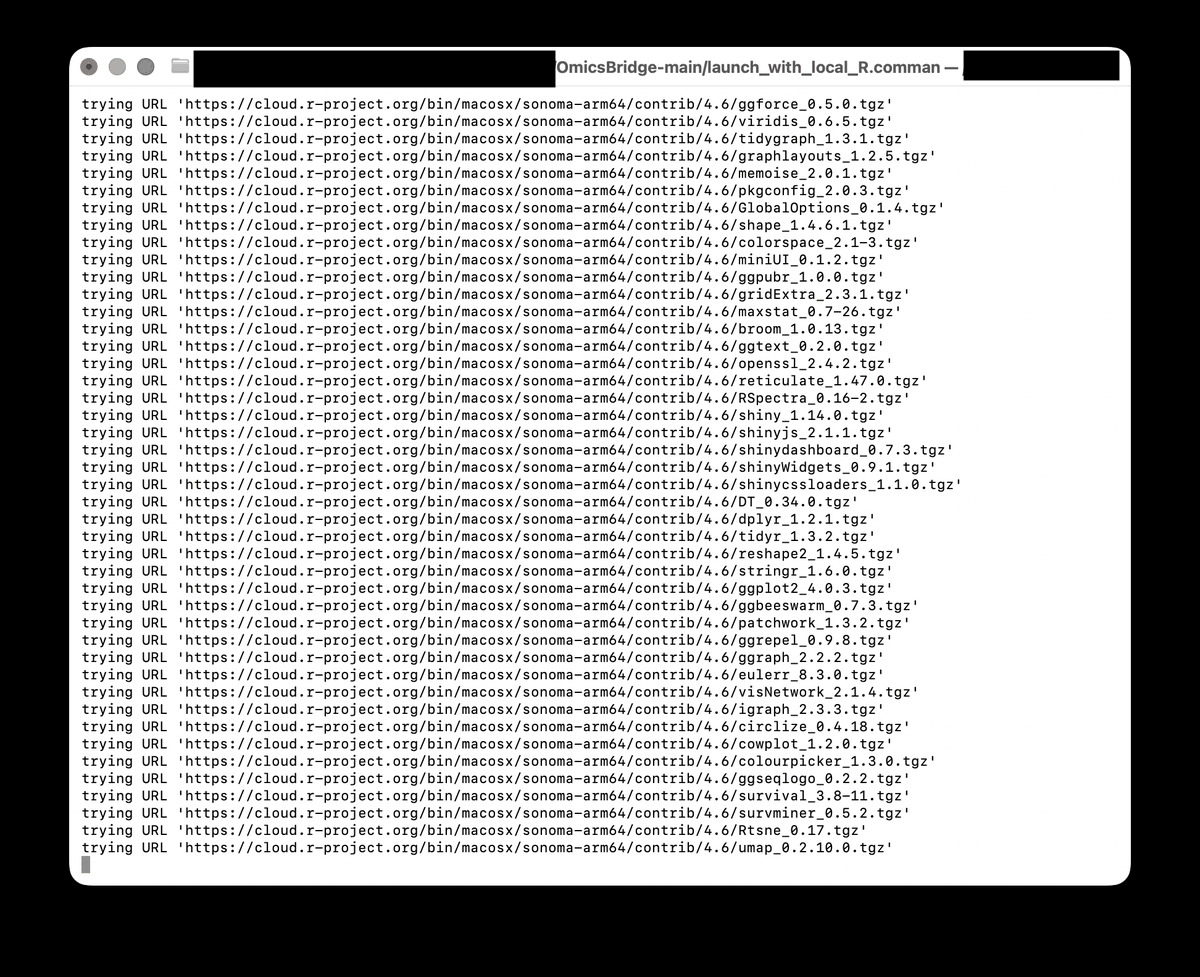
8Open OmicsBridge in your browser
Once you see "Step 2/2: Launching OmicsBridge" and then Listening on http://127.0.0.1:4191, a browser tab should open automatically.
If it doesn't open by itself, go to http://localhost:4191 manually.
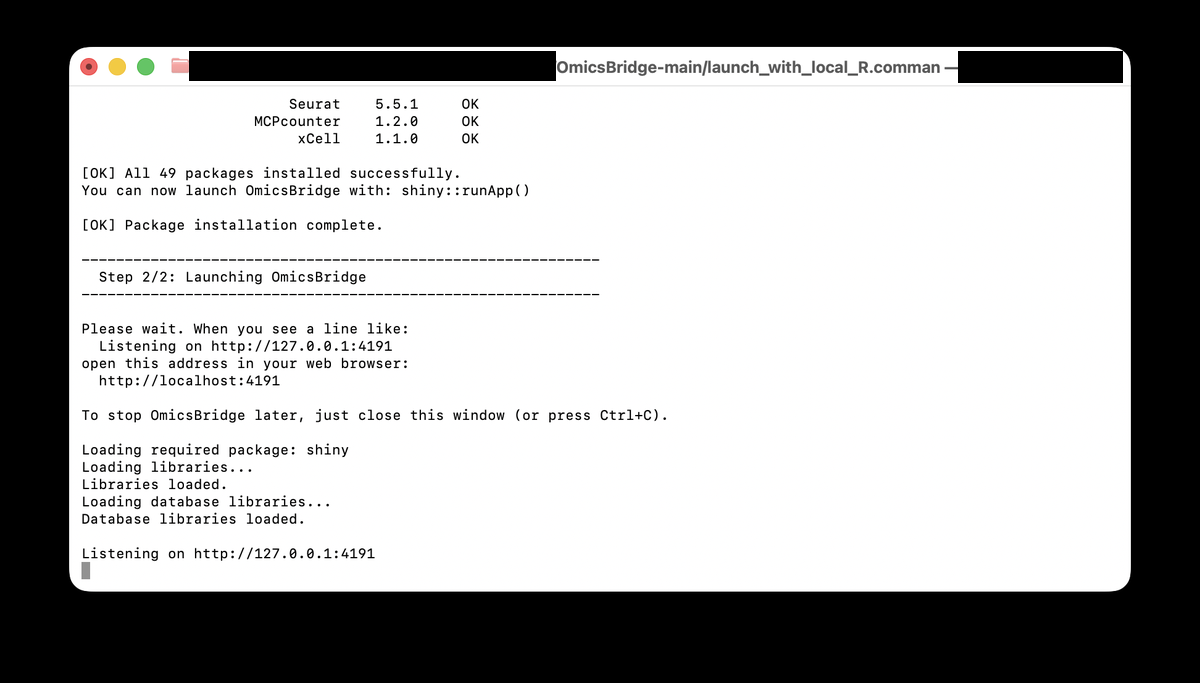
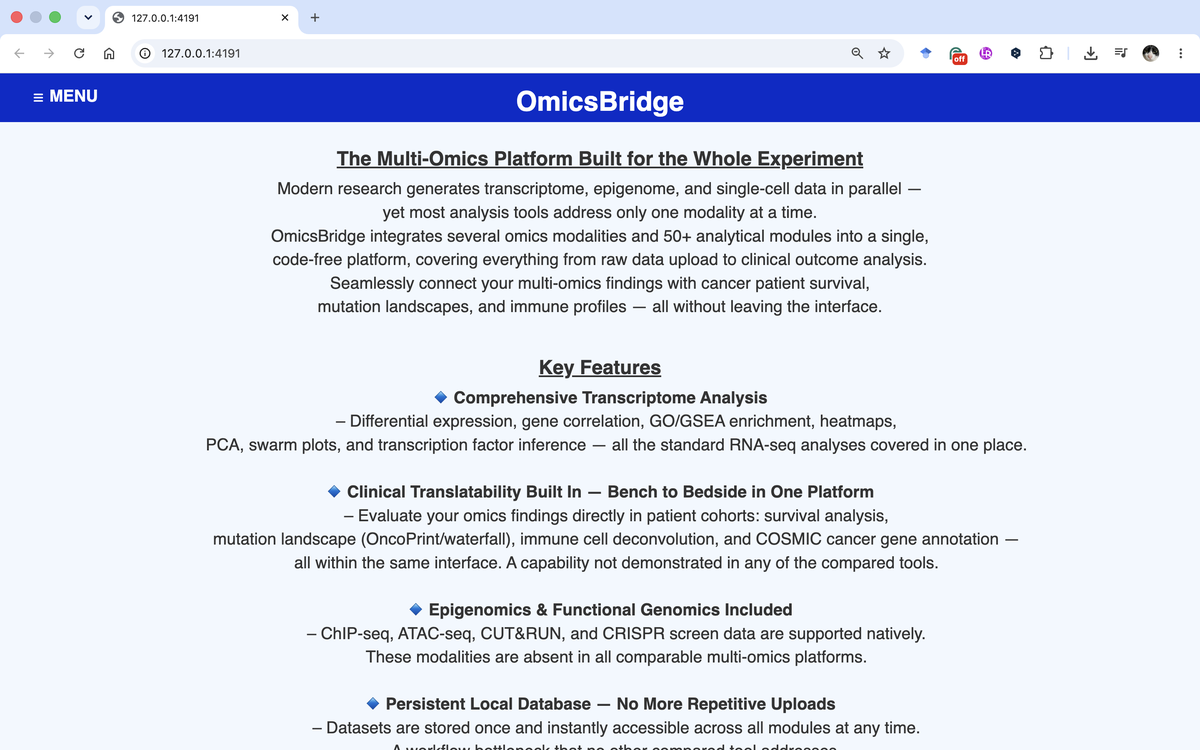
Keep the Terminal window open — closing it stops OmicsBridge.
Next time
Just double-click launch_with_local_R.command again — packages are already installed, so it skips straight to starting up (about 10–20 seconds).
Mac Docker Desktop
Everything below is specific to this path — just follow along top to bottom.
What is Docker?
Docker Desktop lets you run OmicsBridge inside a self-contained "box" (called a container) that already has R and every package it needs pre-installed and tested — you never install R or any package yourself.
Trade-off
A bigger one-time download (a few GB) to fetch that pre-built box.
Benefit
Zero package installation, zero chance of a package failing to compile on your machine.
Good if you'd simply rather not deal with R packages at all.
1Install Docker Desktop
Go to docker.com/products/docker-desktop and download the Mac installer (choose Apple Silicon or Intel — Apple menu → About This Mac tells you which).
Open the downloaded .dmg, then drag the Docker icon into the Applications folder, same as installing any other Mac app.
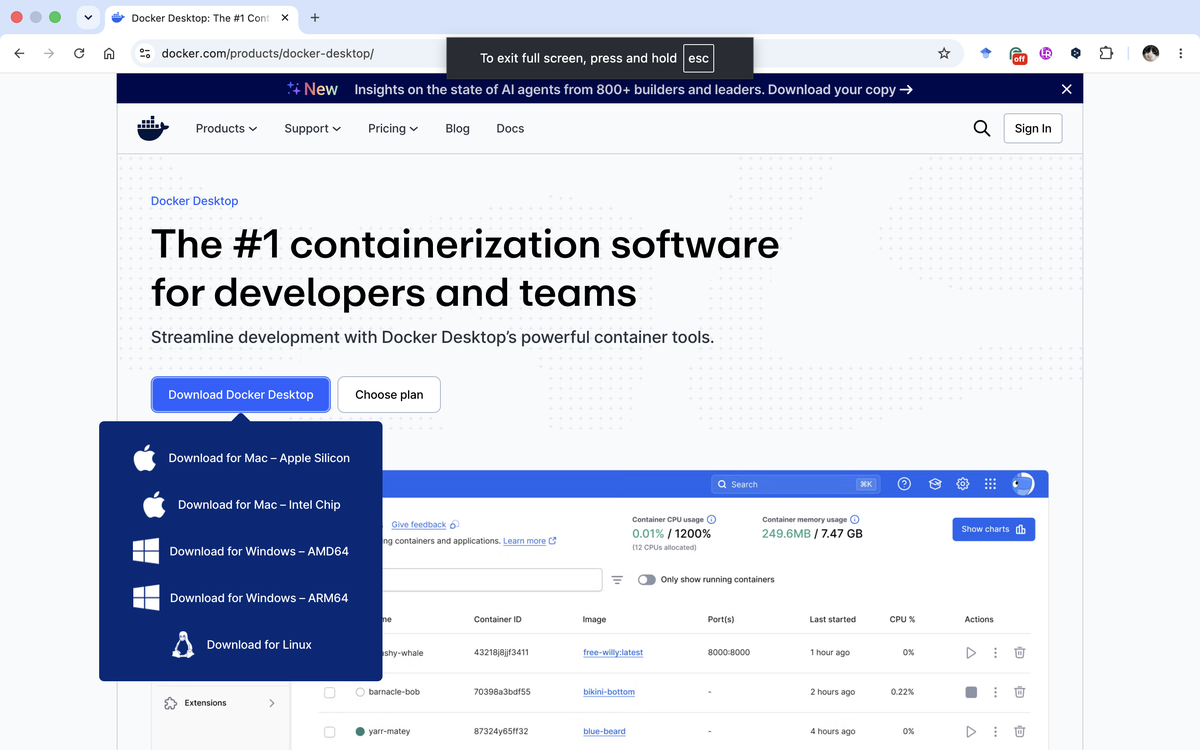
2Confirm Docker is running
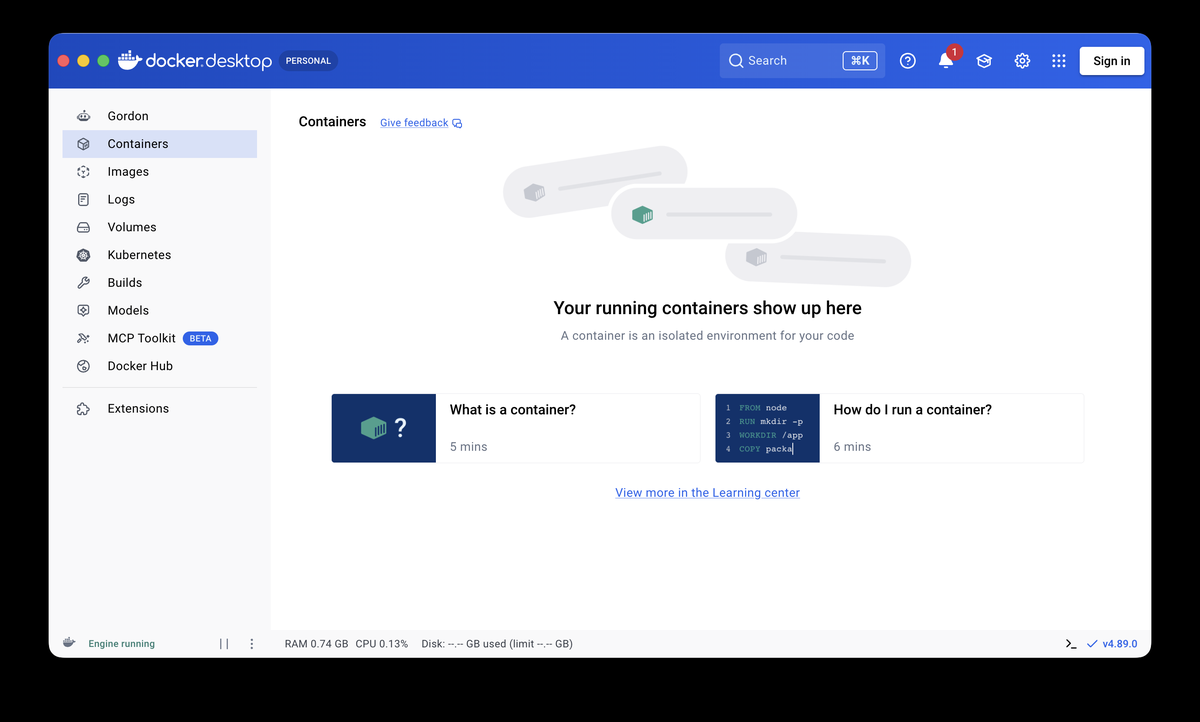
Open Docker Desktop from Applications. Look for the little whale icon in the top menu bar — leave Docker Desktop running in the background for every step that follows.
If asked to sign in, look for a line saying "You do not have to log in or create an account" — signing in isn't required.

3Get the OmicsBridge files
Go to github.com/htsmto/OmicsBridge, click the green Code button → Download ZIP.
Double-click the downloaded ZIP in Finder to unzip it — pick somewhere easy to find, e.g. your Desktop.
The unzipped folder is named OmicsBridge-main (not just OmicsBridge) — that's fine, no need to rename it. This guide just calls it "the OmicsBridge folder."
4Download the data
Go to the Zenodo page and download:
00_Clinical_dataset.tar.gz— curated TCGA data, required00_Expression_data_all.tar.gz— demo data, optional
00_Expression_data_all.tar.gz is demo data only, and it's large. OmicsBridge runs fine without it — skip it now and come back for it later if you want the full demo.
5Unzip the data into the OmicsBridge folder
Move the downloaded .tar.gz file(s) into the OmicsBridge folder, then double-click each one — Finder unzips .tar.gz files natively on Mac, no extra software needed.
6Launch OmicsBridge
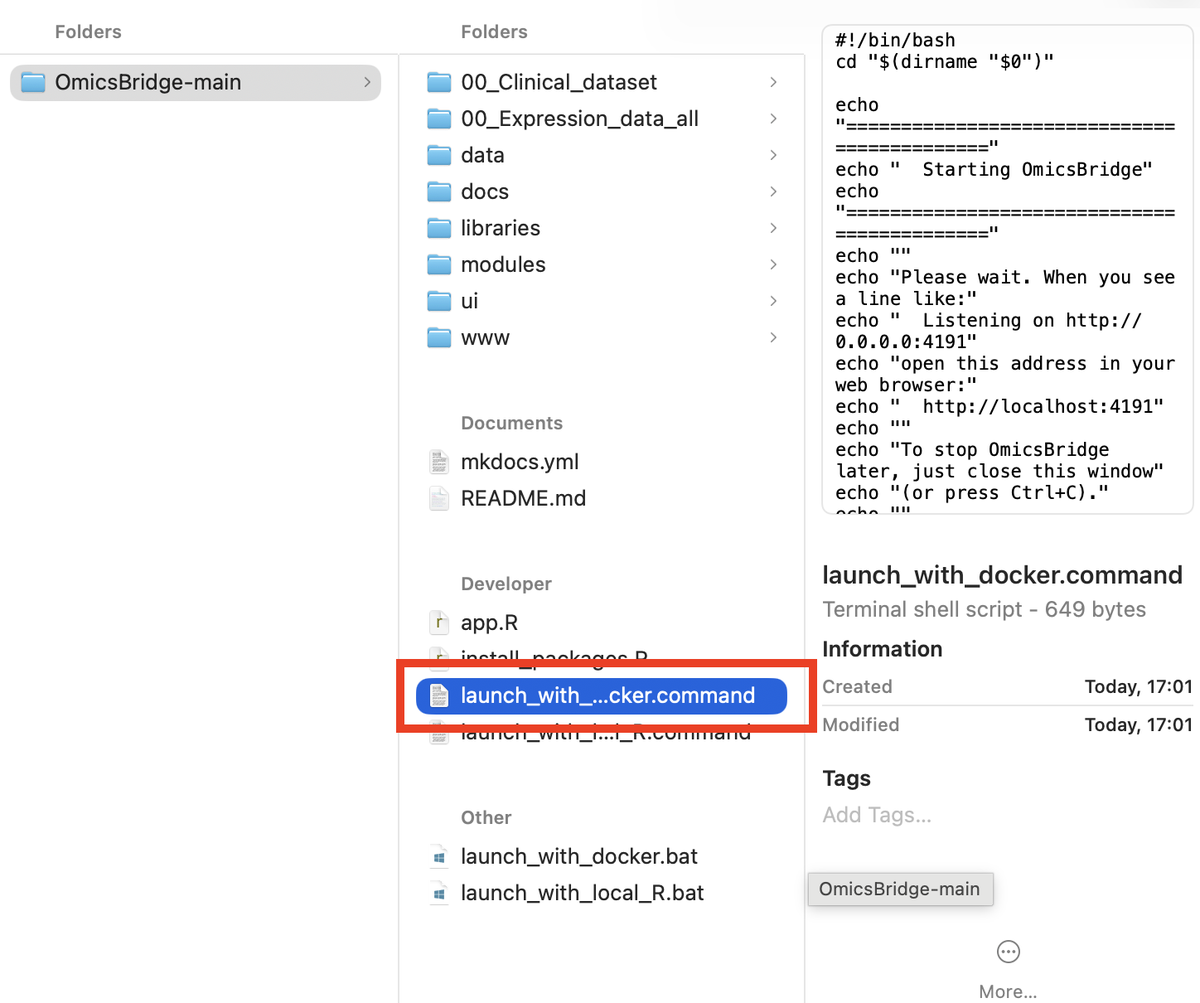
In the OmicsBridge folder, double-click launch_with_docker.command.
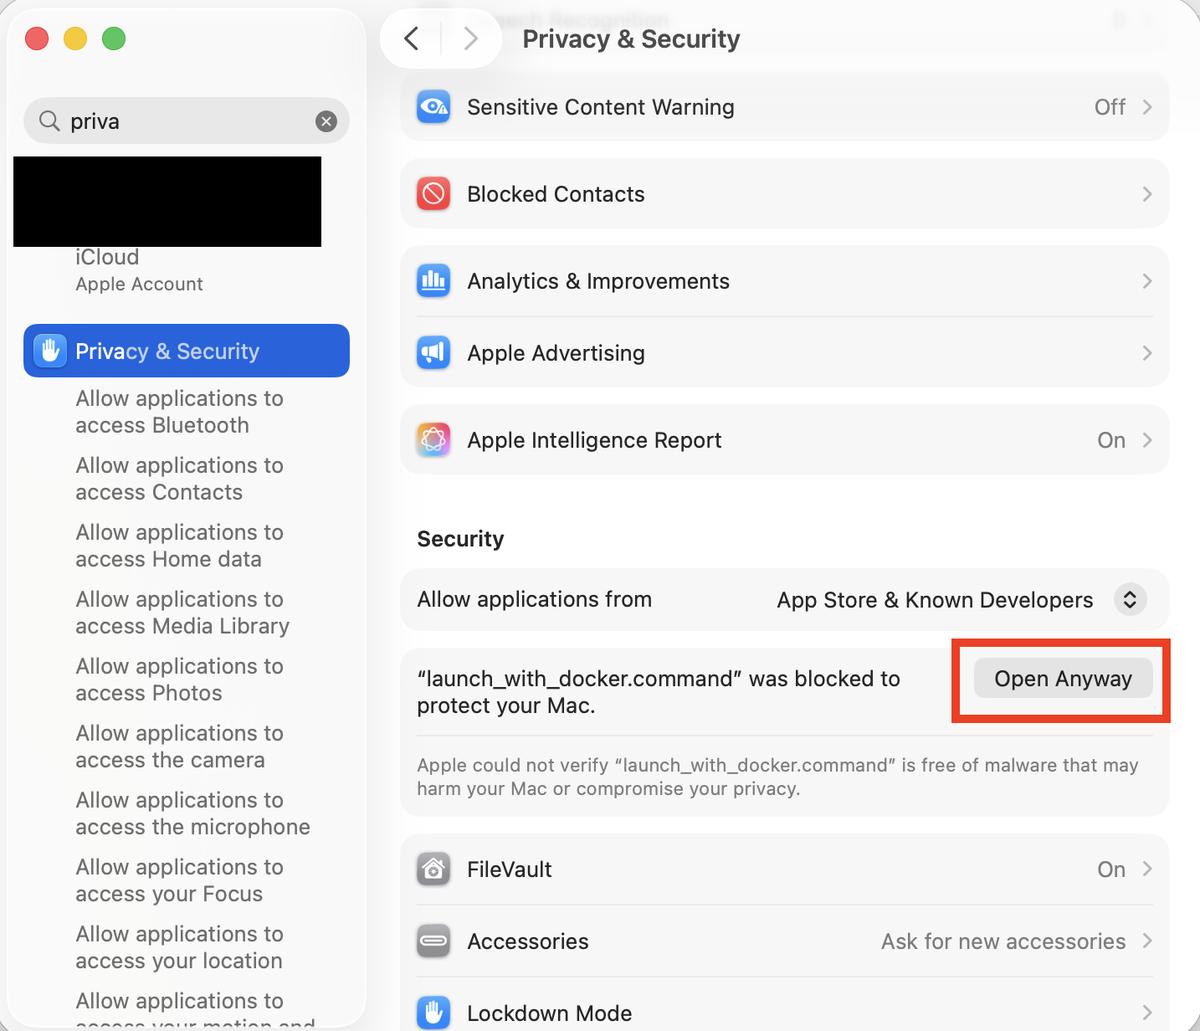
You'll likely see: "Apple could not verify 'launch_with_docker.command' is free of malware..." Click Done (not "Move to Bin"). Try right-click the file → Open → Open first — if that doesn't work, go to System Settings → Privacy & Security, scroll down to the message about this file being blocked, and click Open Anyway (you'll be asked for your password or Touch ID). You only need to do this once.
7First run: downloading the app image
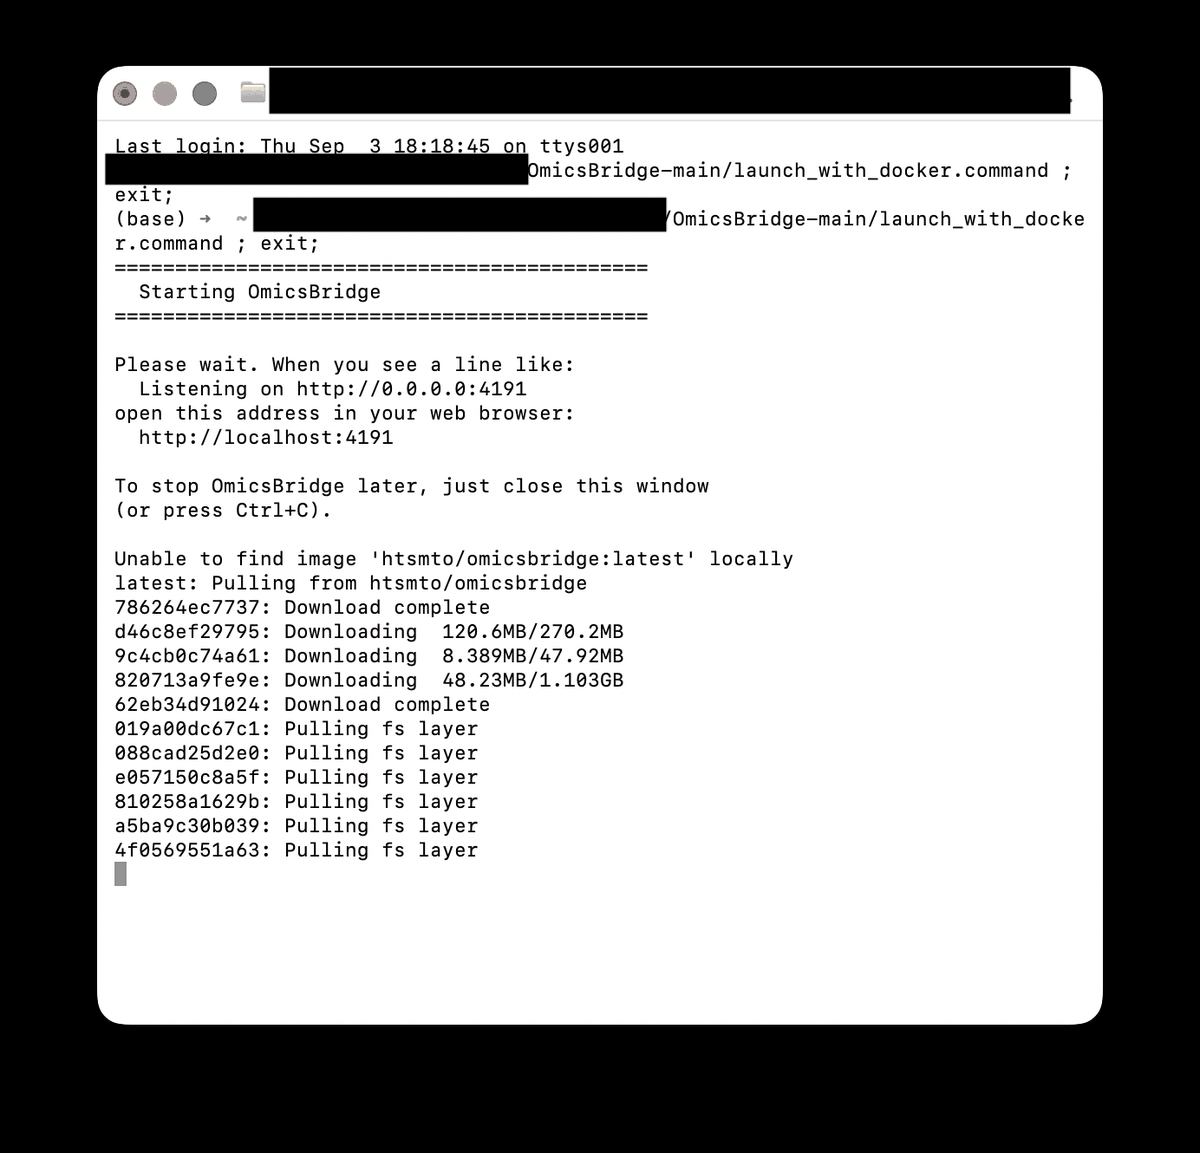
A black Terminal window opens. The first time only, Docker downloads the OmicsBridge image (a few GB) before starting it — this can take several minutes depending on your connection. Leave it running.
Every launch after this one skips straight to starting up.
8Open OmicsBridge in your browser
Once you see a line like Listening on http://0.0.0.0:4191, open http://localhost:4191 in your browser.
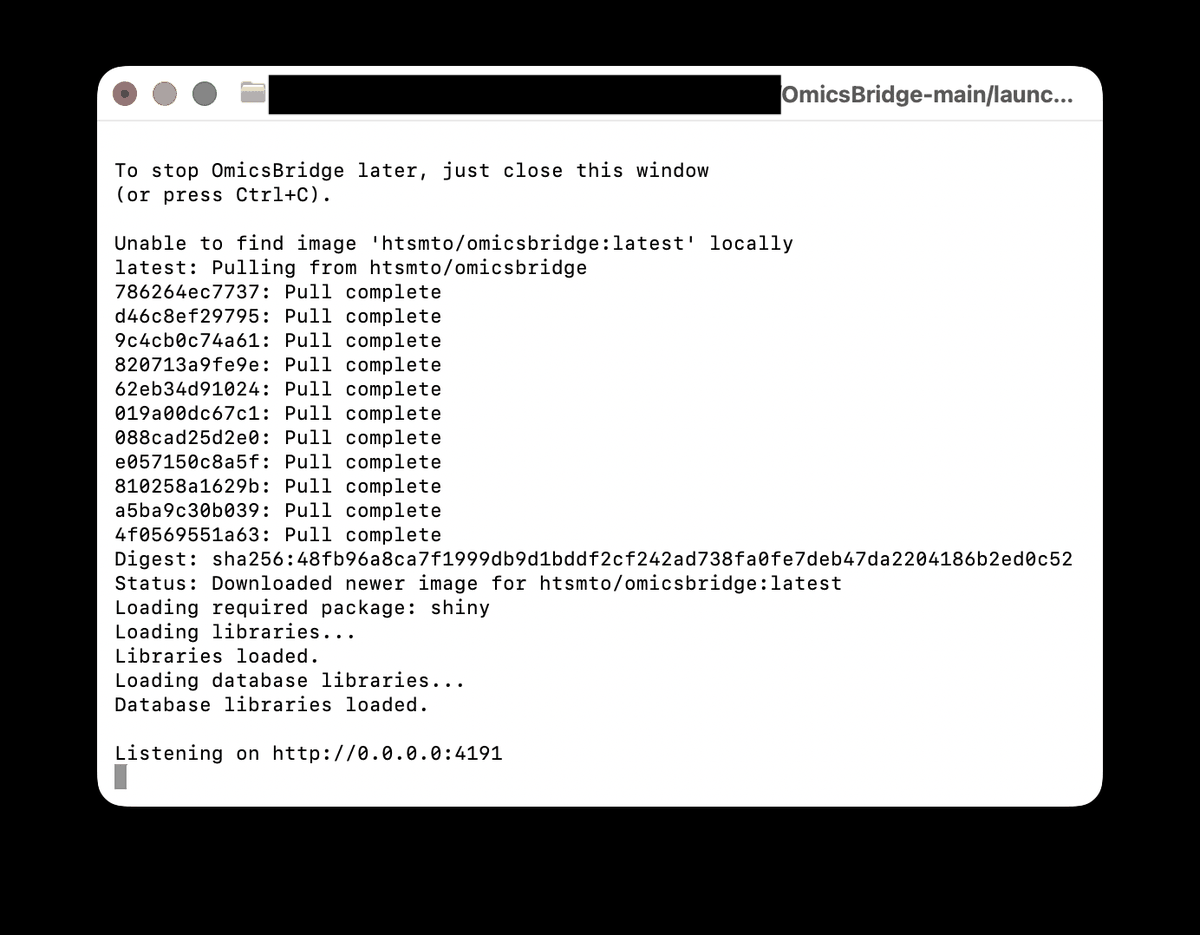
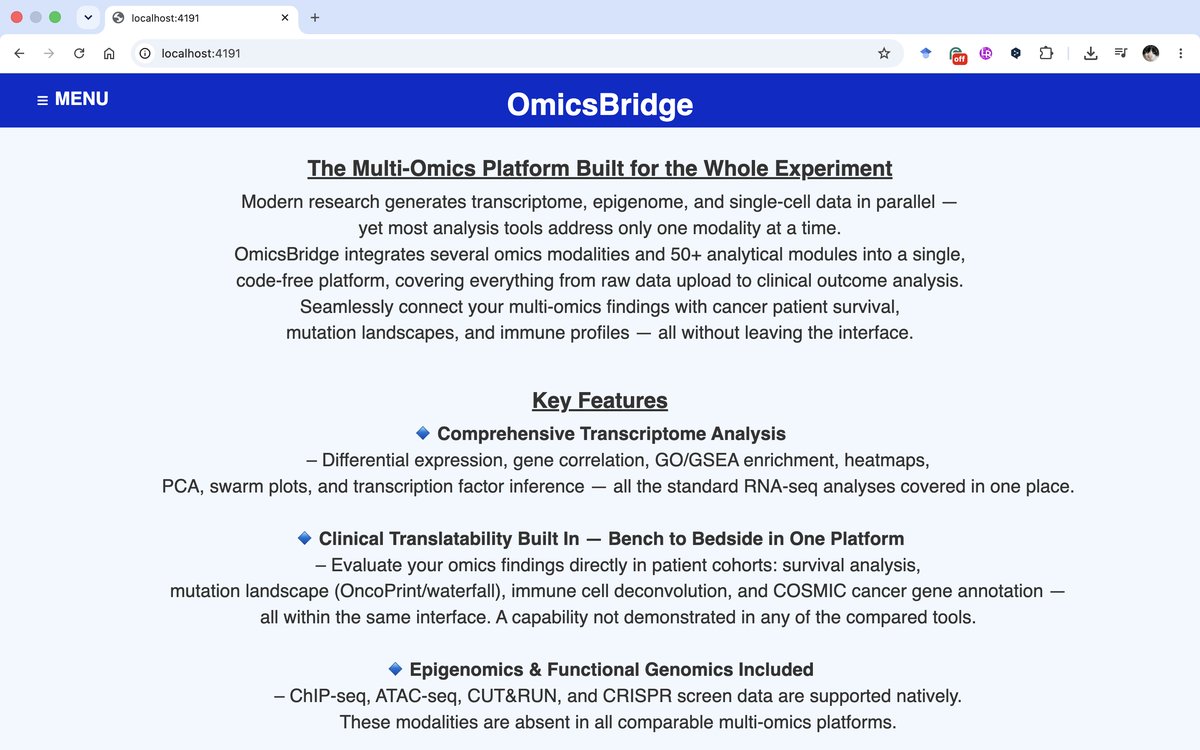
Keep the Terminal window open — closing it stops OmicsBridge.
Next time
Just double-click launch_with_docker.command again — the image is already on your computer, so it skips straight to starting up.
Windows Your own R
Everything below is specific to this path — just follow along top to bottom.
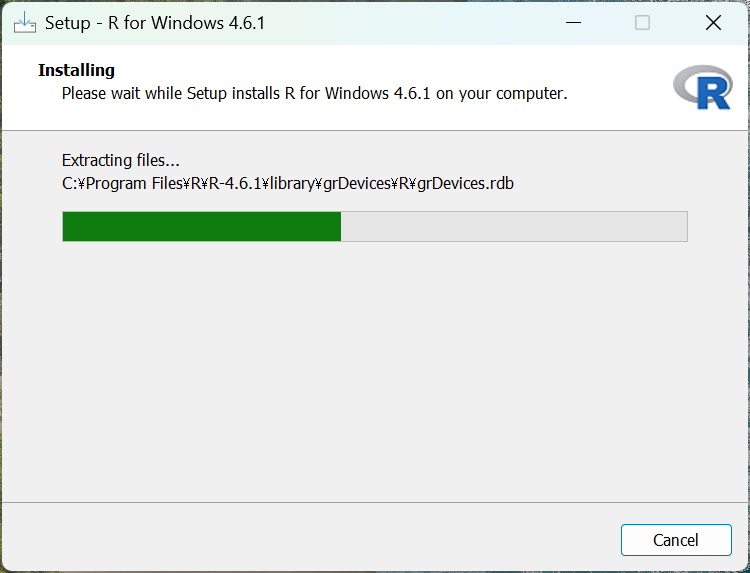
1Install R
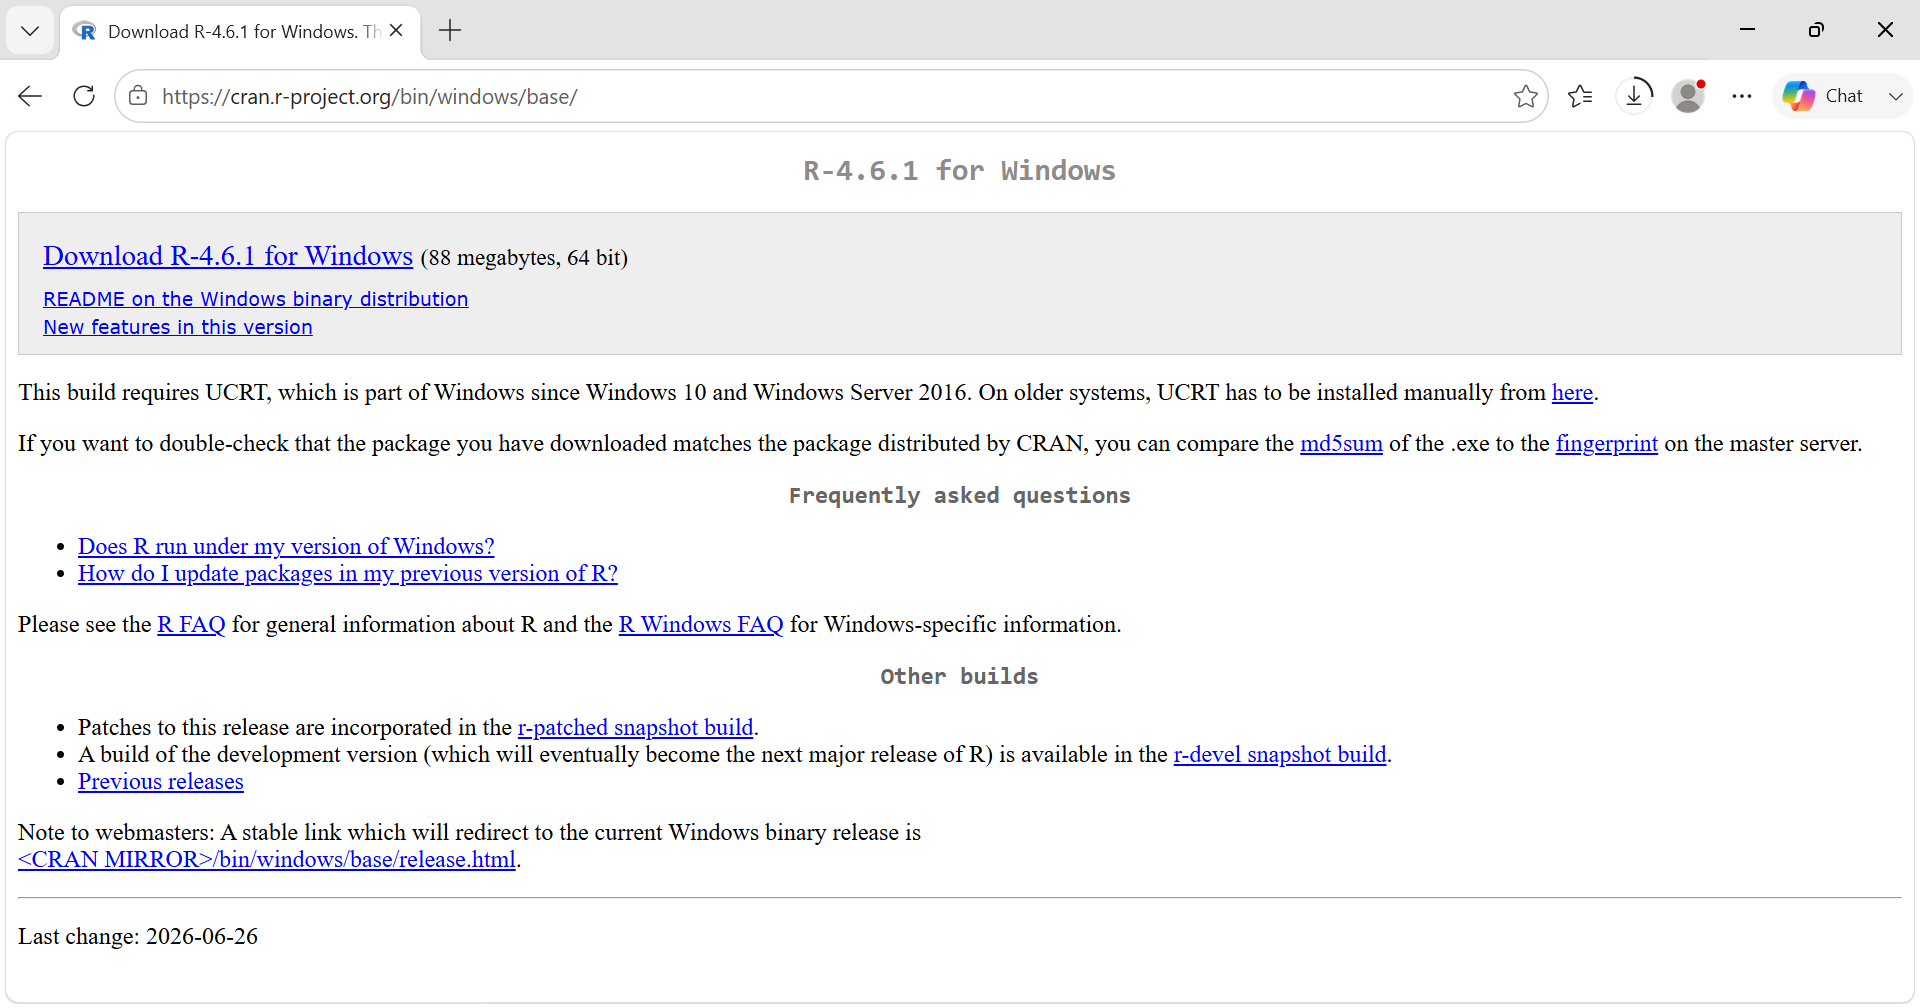
Go to cran.r-project.org/bin/windows/base/ and download the installer (.exe).
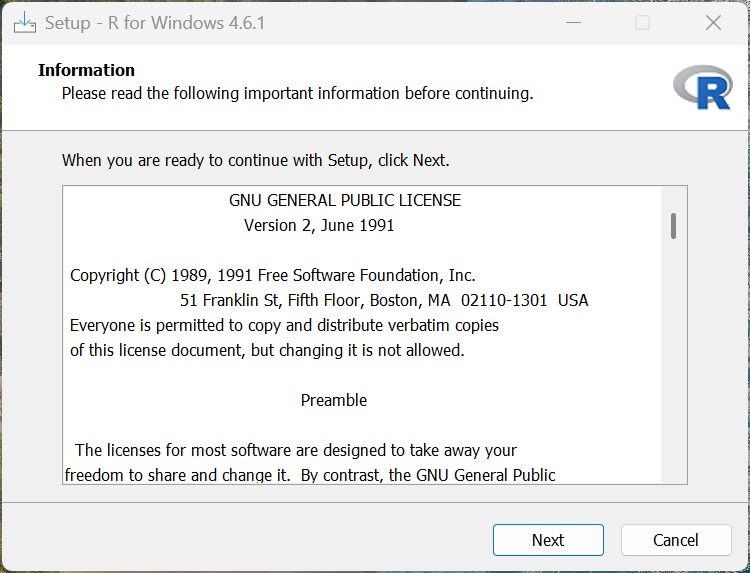
Run the installer and accept the default options, same as installing any other Windows application.
Version 4.4.0 or higher is required. If unsure, just install the newest version offered.
2Install Rtools
Some R packages need to be compiled — without this, package installation can fail partway through.
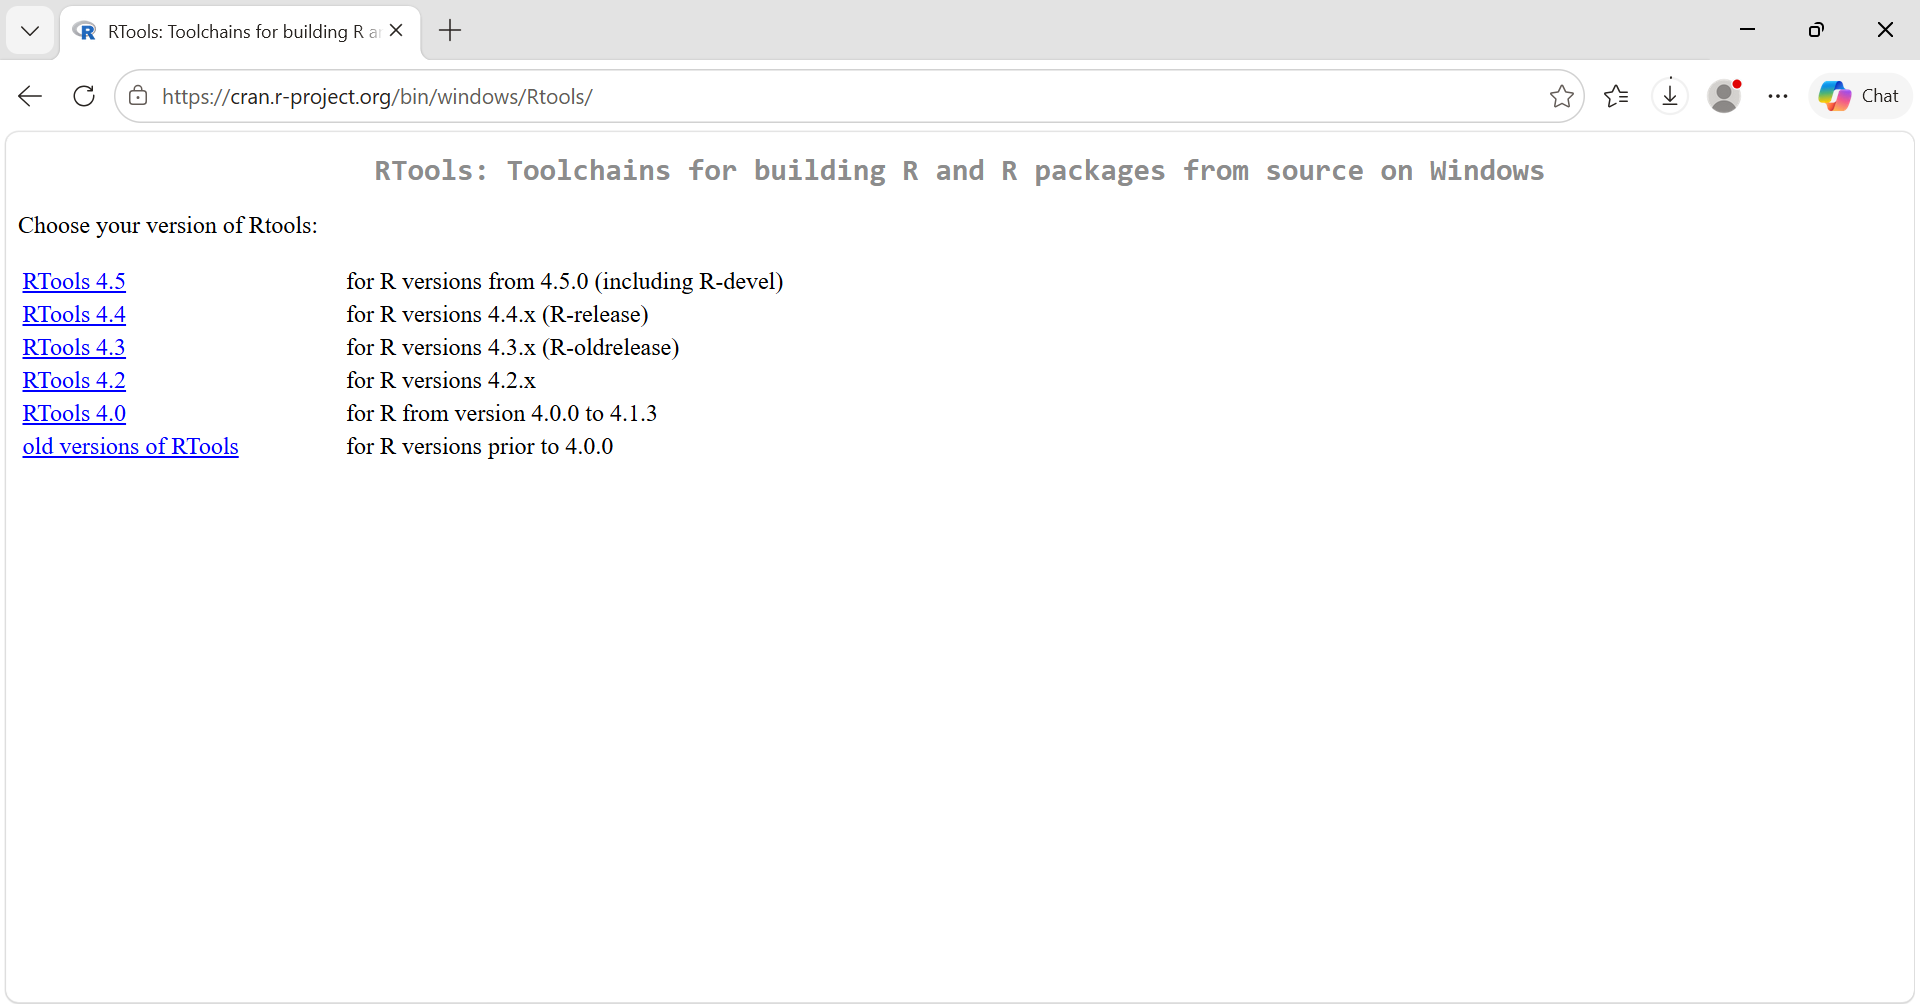
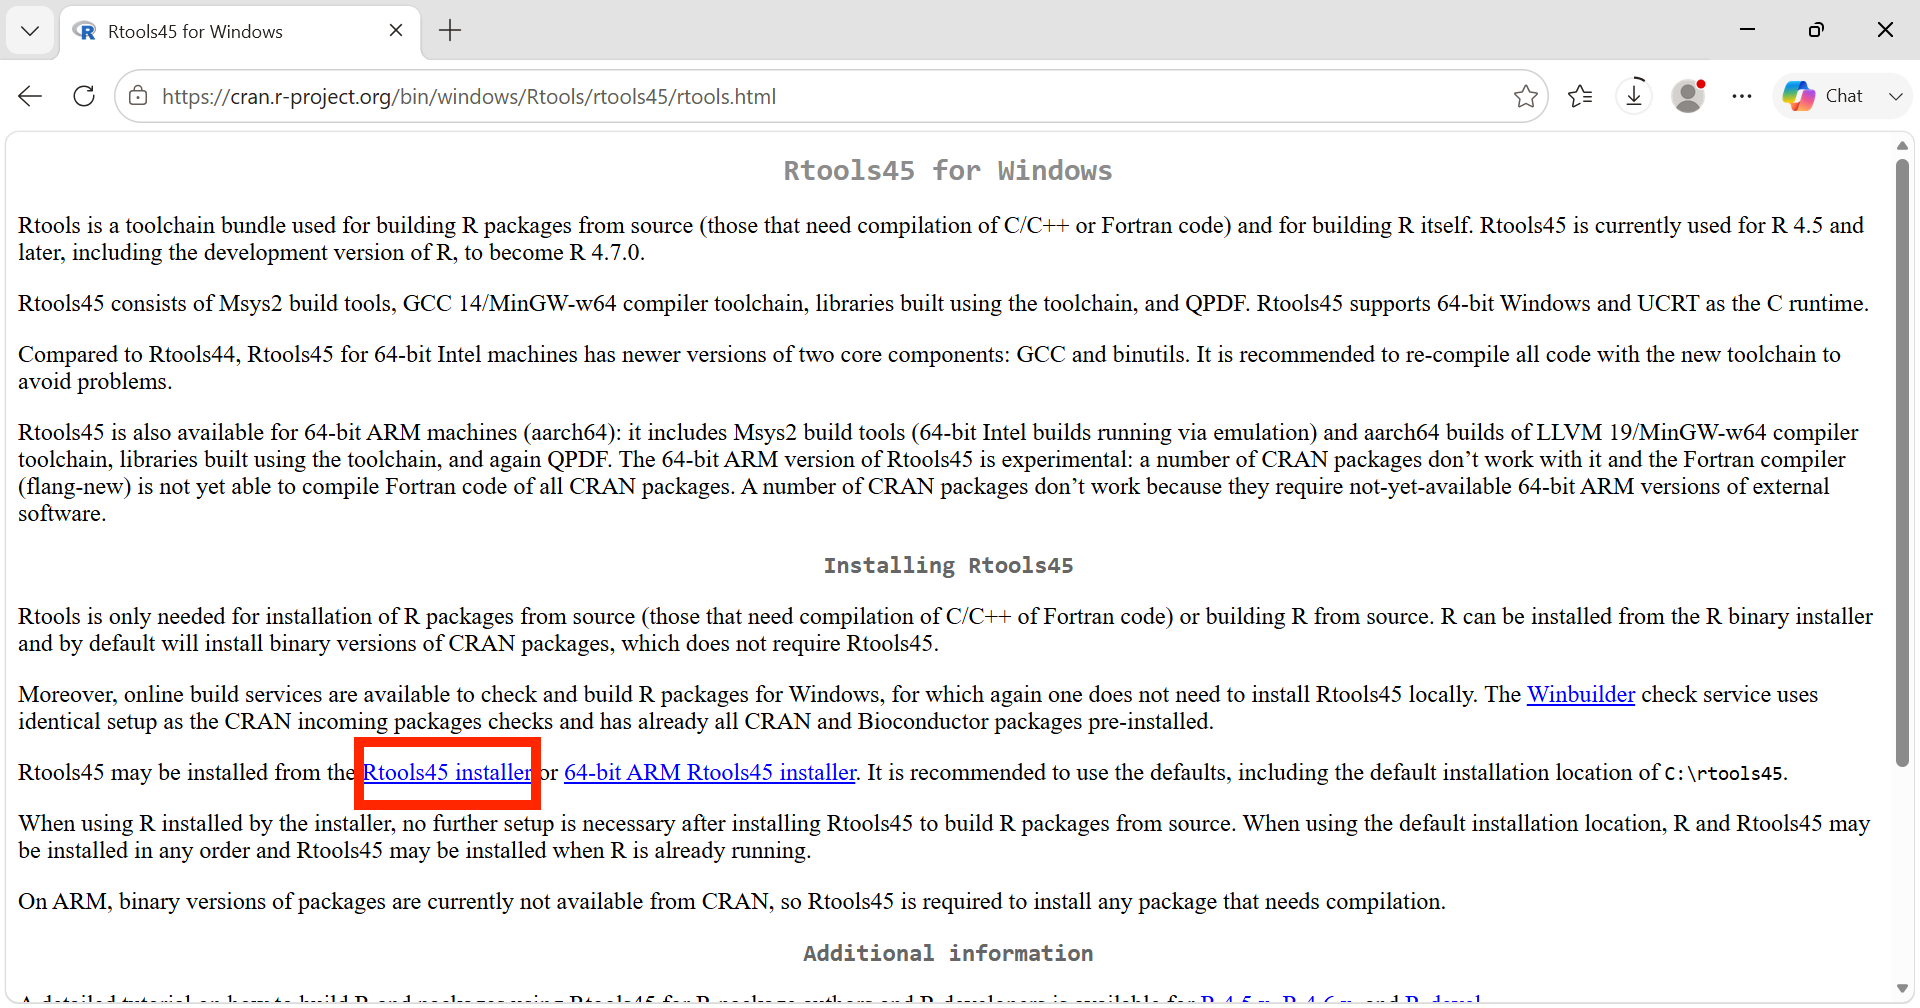
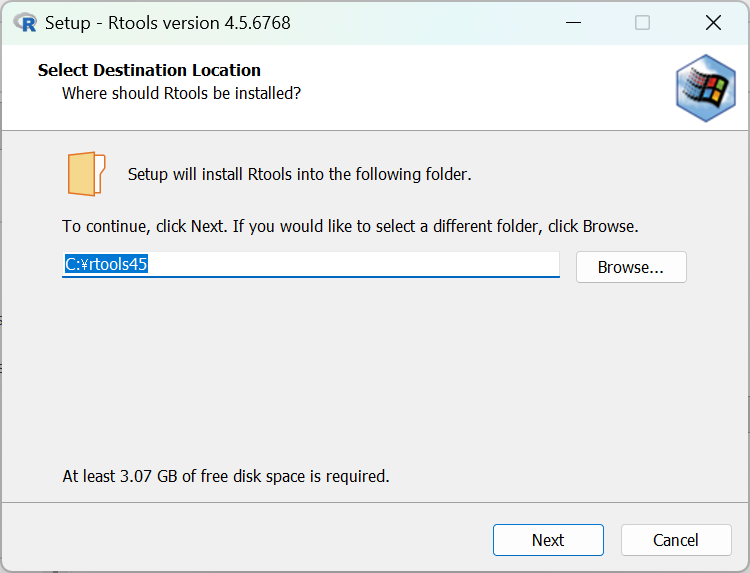
Go to cran.r-project.org/bin/windows/Rtools/, download the Rtools version matching your R version, and run the installer with default options.
3Get the OmicsBridge files
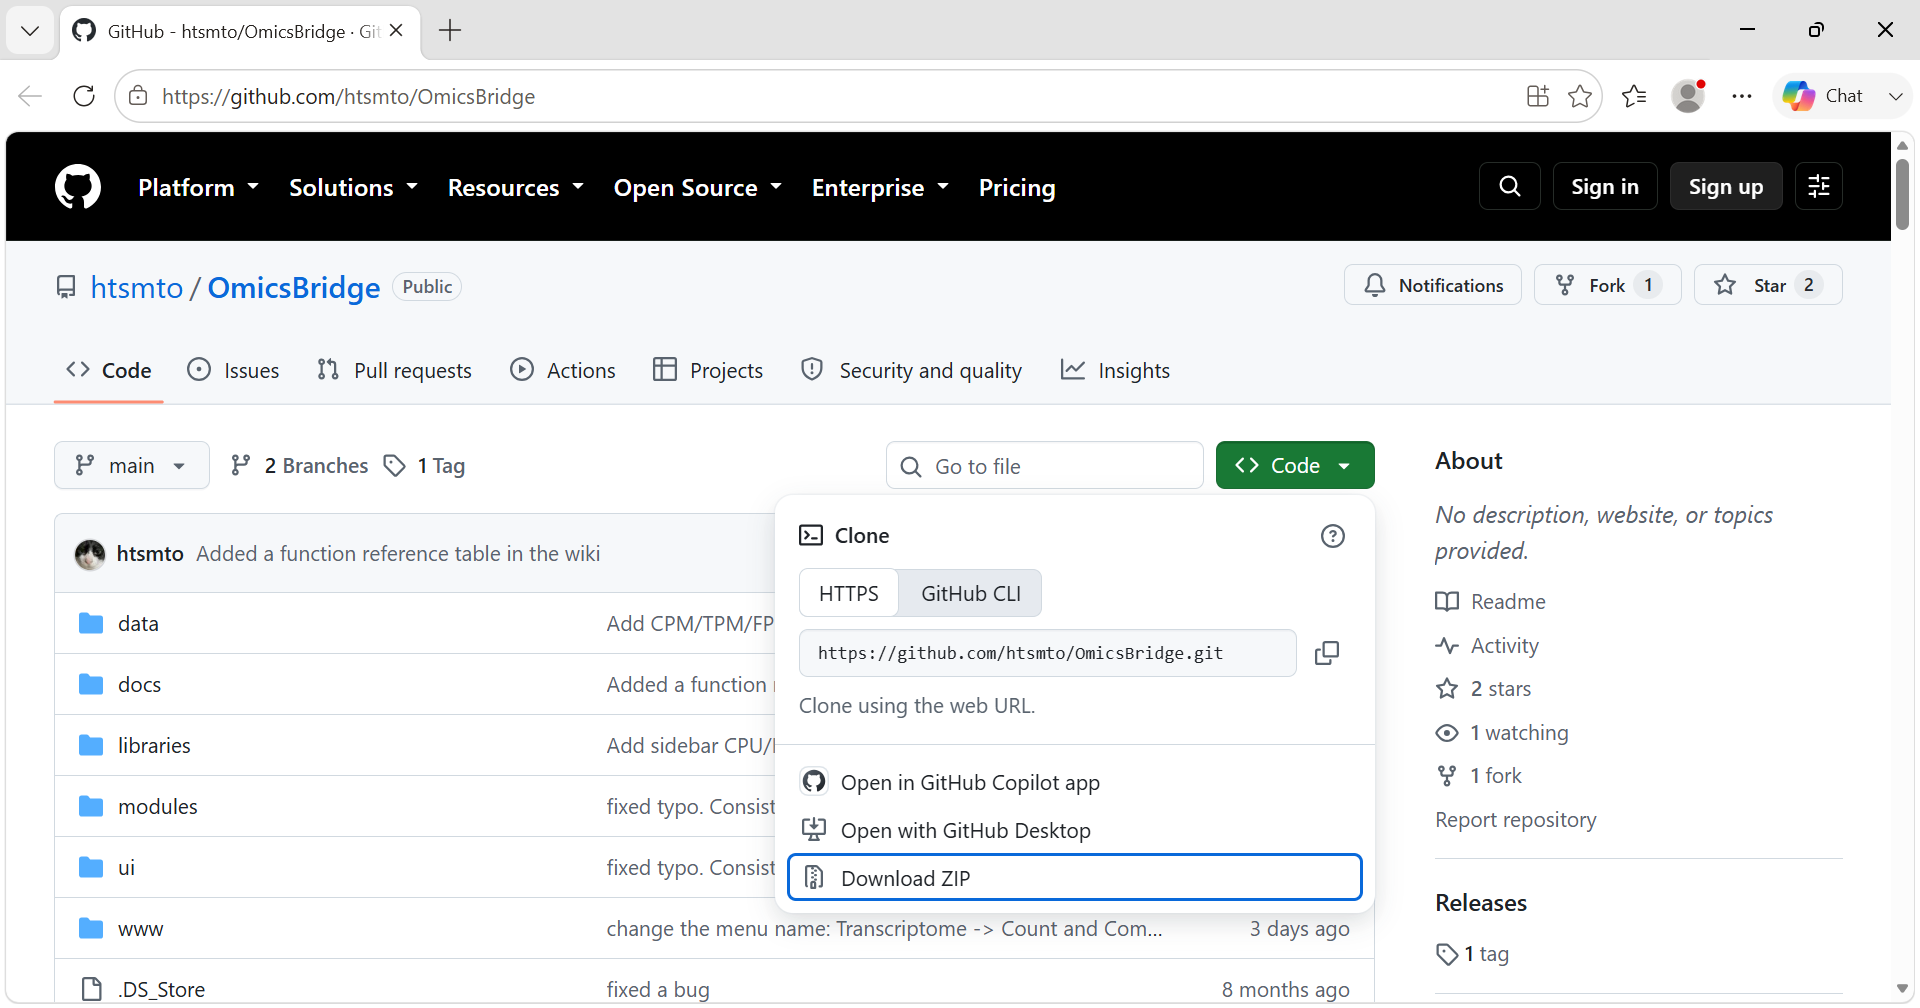
Go to github.com/htsmto/OmicsBridge, click the green Code button → Download ZIP.
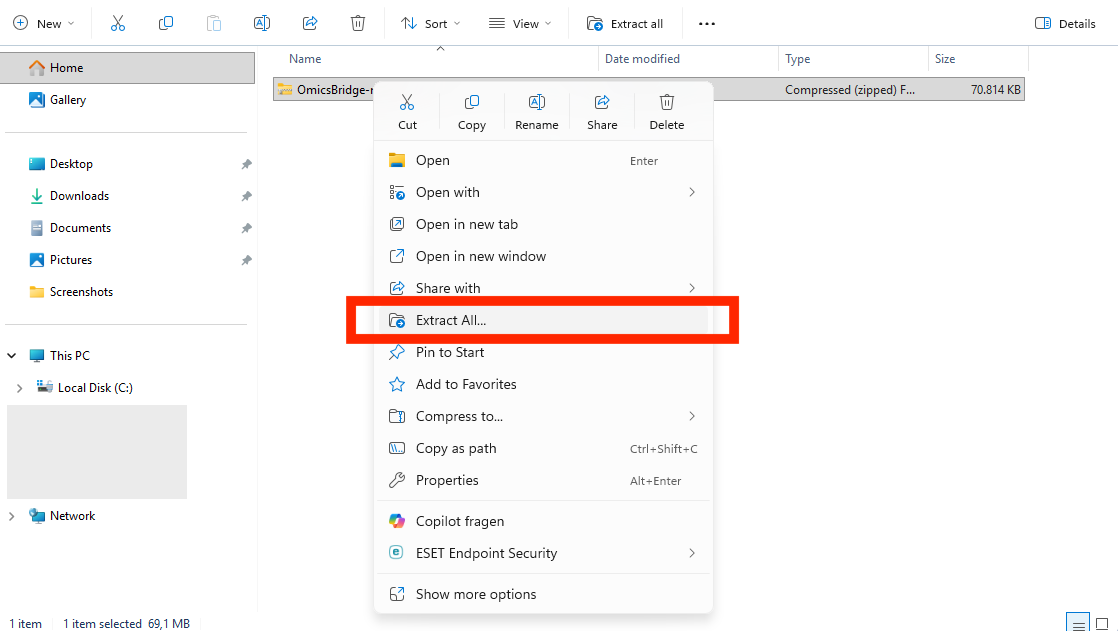
Right-click the downloaded ZIP → Extract All... → choose a destination (e.g. Desktop) → Extract.
The extracted folder is named OmicsBridge-main (not just OmicsBridge) — that's fine, no need to rename it. This guide just calls it "the OmicsBridge folder."
4Download the data
Go to the Zenodo page and download:
00_Clinical_dataset.tar.gz— curated TCGA data, required00_Expression_data_all.tar.gz— demo data, optional
00_Expression_data_all.tar.gz is demo data only, and it's large. OmicsBridge runs fine without it — skip it now and come back for it later if you want the full demo.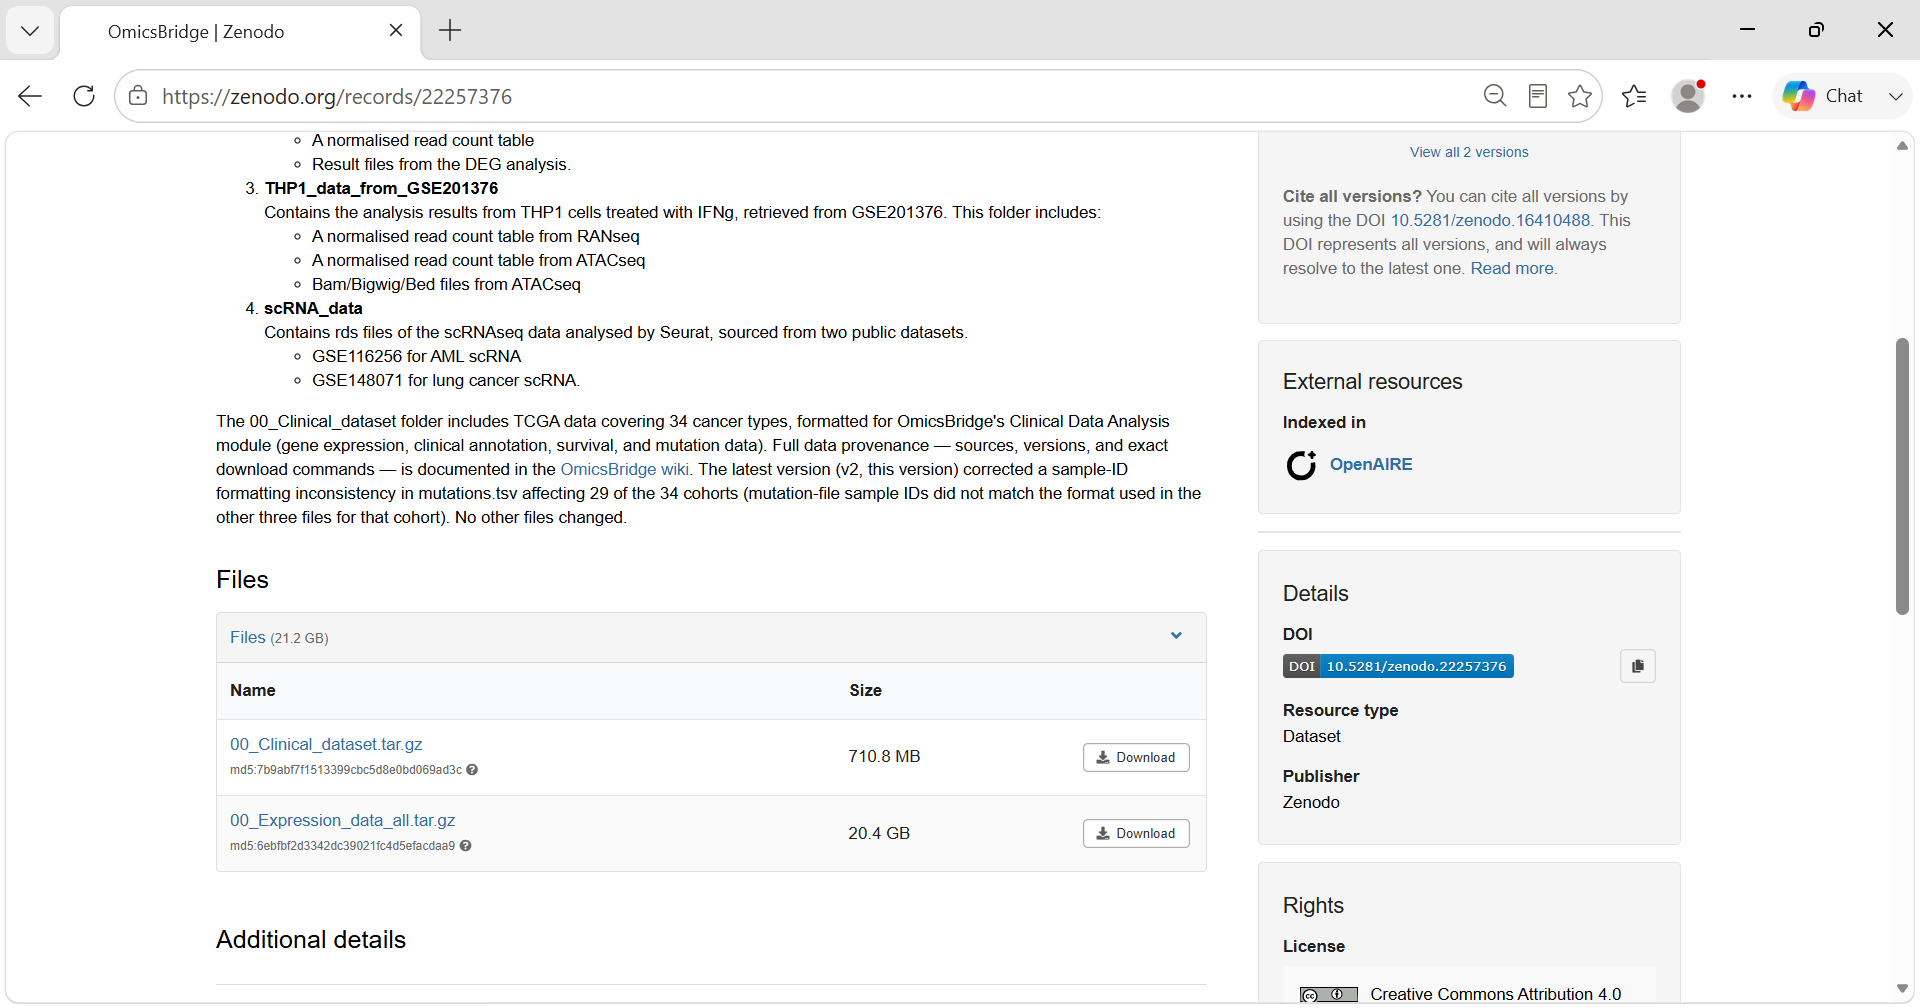
5Unzip the data into the OmicsBridge folder
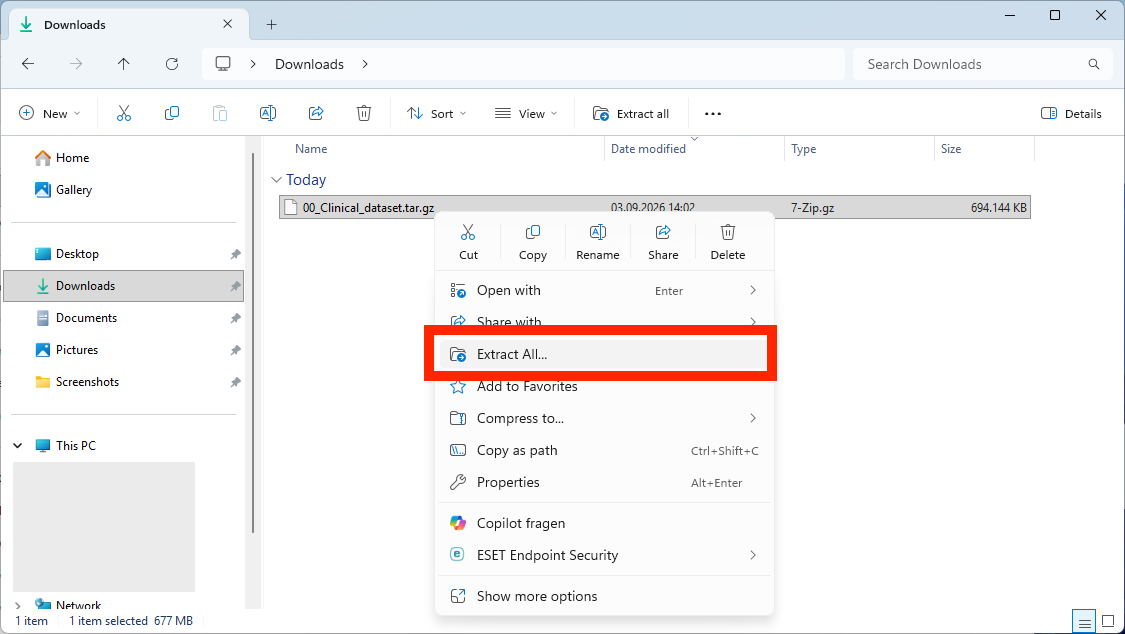
Move the downloaded .tar.gz file(s) into the OmicsBridge folder, then right-click each one → Extract All... → Extract.
Watch out: Windows' "Extract All" suggests a destination folder with the same name as the archive. If you accept that default, you'll end up with a doubled-up folder like 00_Clinical_dataset\00_Clinical_dataset\.... Before clicking Extract, edit the destination path to remove that extra trailing folder name, so the data lands directly in OmicsBridge\00_Clinical_dataset\....
Already got the doubled folder? Open the inner 00_Clinical_dataset folder, select all its contents, cut, go up one level, paste, then delete the now-empty inner folder.
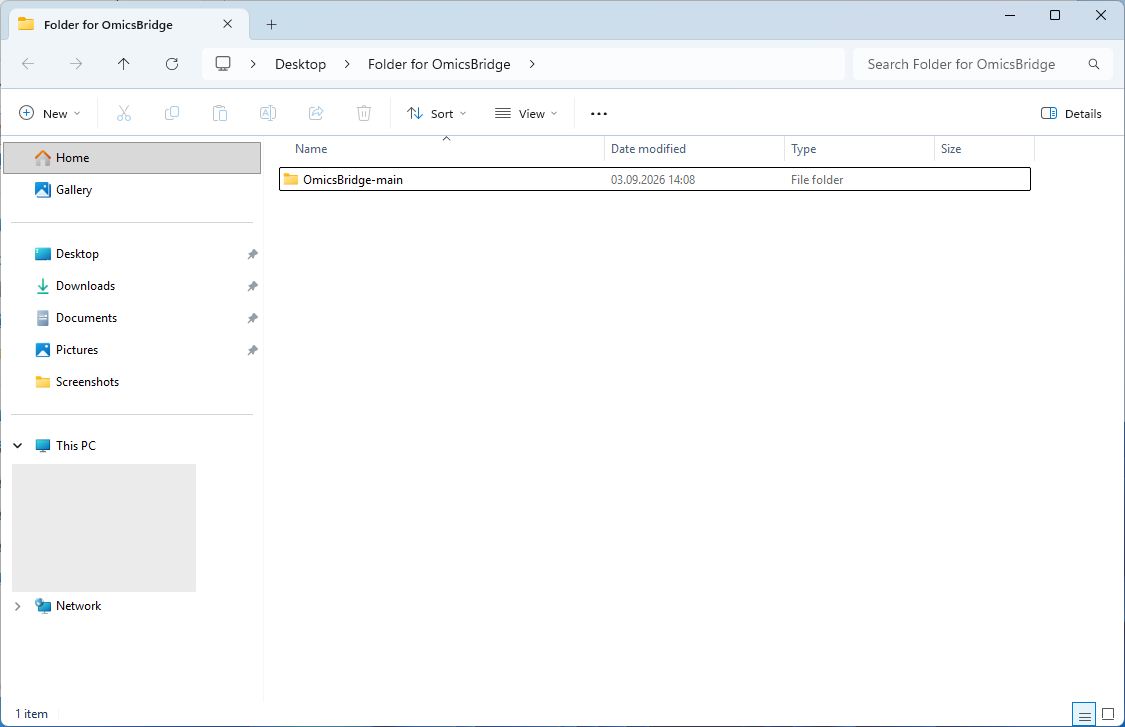
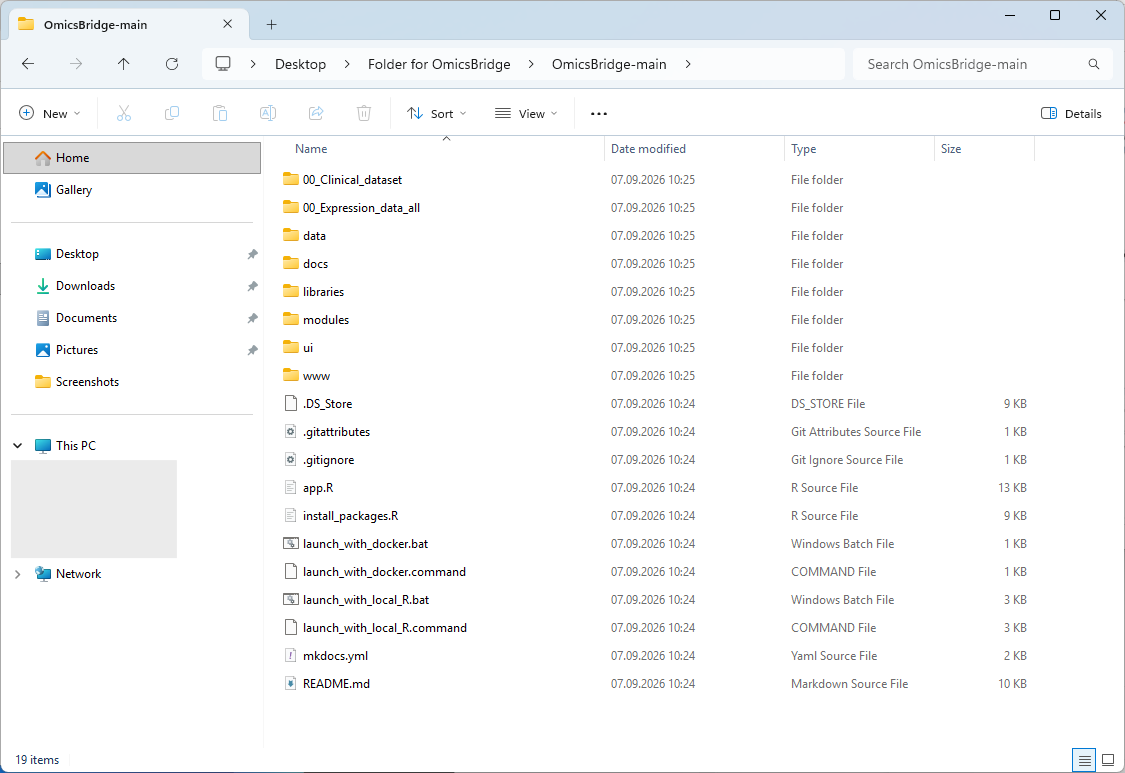
Example: here OmicsBridge-main sits inside a folder called Folder for OmicsBridge on the Desktop. Extracting 00_Clinical_dataset.tar.gz (and optionally 00_Expression_data_all.tar.gz) directly into OmicsBridge-main — alongside app.R and the launcher files — turns the folder on the left into the one on the right.
6Launch OmicsBridge
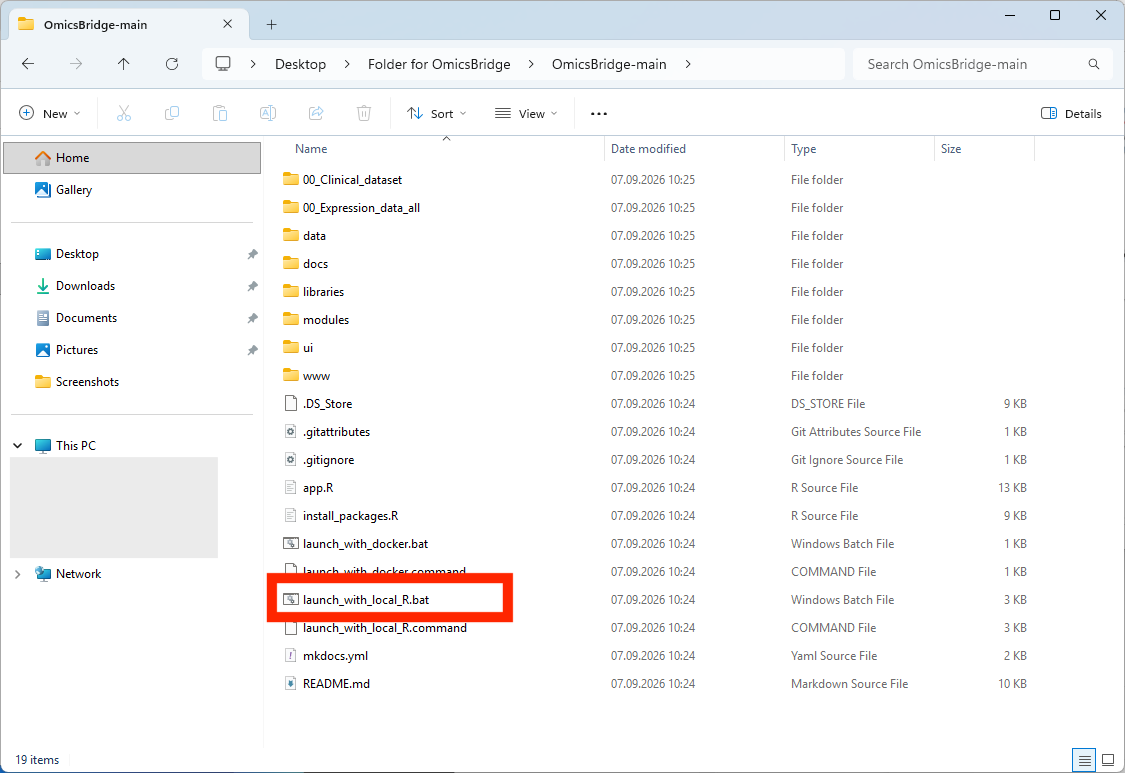
In the OmicsBridge folder, double-click launch_with_local_R.bat.
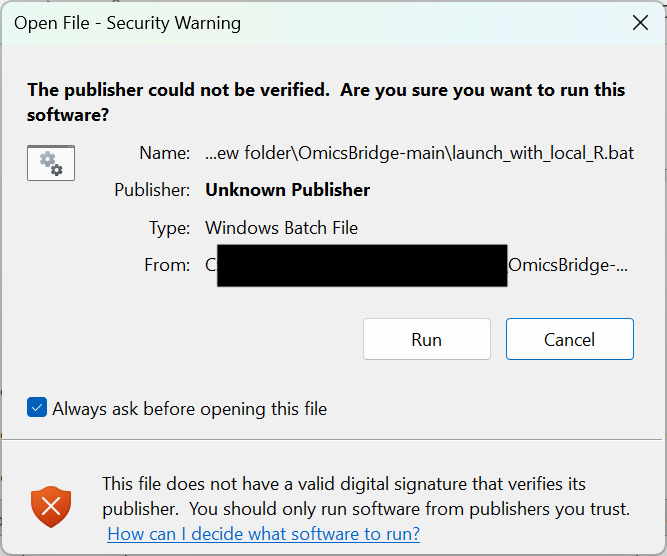
You'll likely see a blue "Windows protected your PC" screen (SmartScreen, since the script is unsigned). Click More info → Run anyway. You only need to do this once.
The script automatically finds R even if it isn't on your Windows PATH, so no extra setup is needed here.
If package installation fails with a message like 'C:/Program Files/R/R-x.y.z/library' is not writable, R doesn't have permission to write to its install folder. Right-click launch_with_local_R.bat → Run as administrator, then try again.
7First run: installing packages
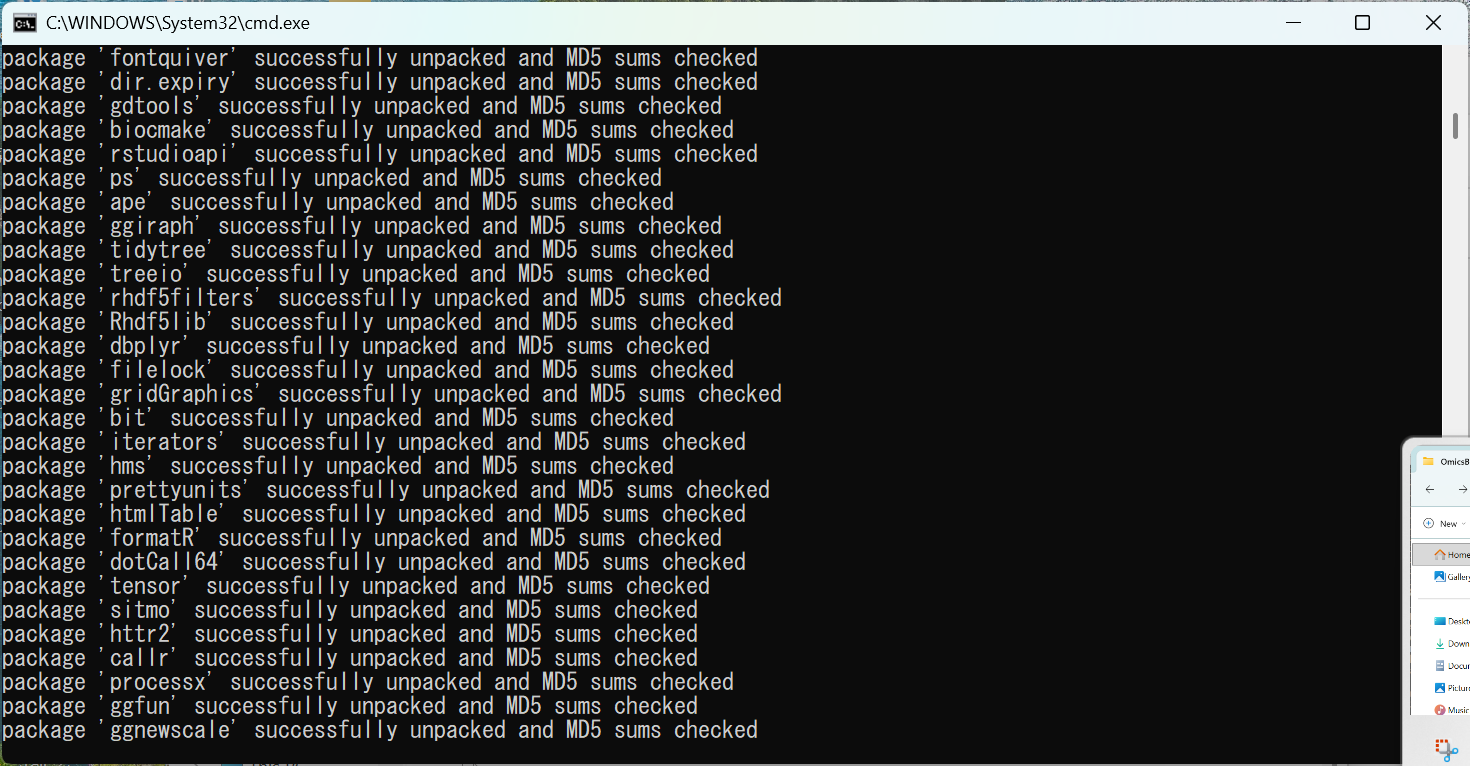
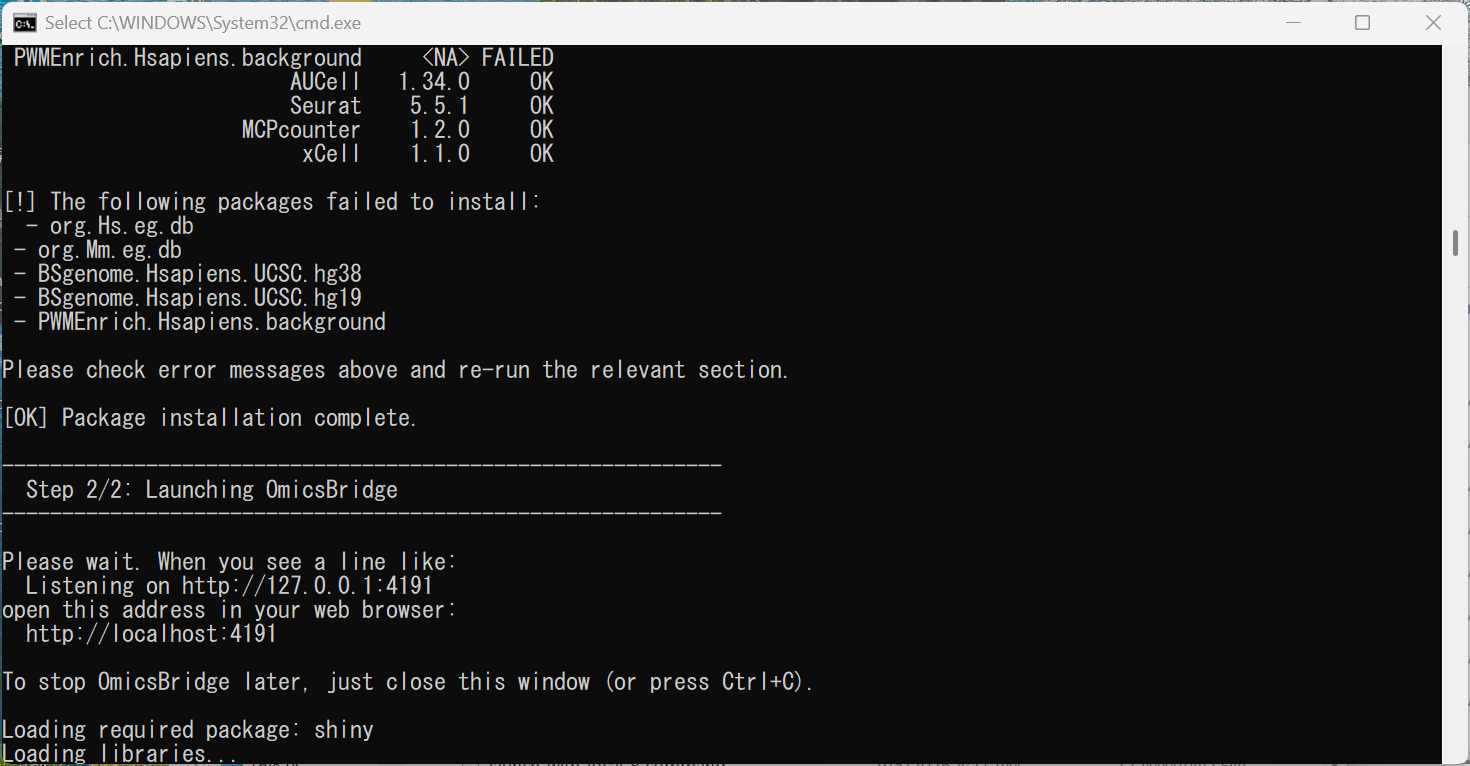
A black window opens and shows "Step 1/2: Installing required R packages" — this happens only the first time, and can take anywhere from several minutes up to about an hour depending on your internet connection. Leave it running.
You'll see a long scroll of package names and download messages — that's normal. Every launch after this one skips straight to starting up.
It's fine if a handful of packages fail here — OmicsBridge can often still run even with a few missing. Scroll up in the log to find the final "Installation Summary" table; any package marked FAILED can be installed separately by opening R on its own and running install.packages("package_name") or BiocManager::install("package_name") for each one. This can get fiddly depending on your machine — if you get stuck, it's worth asking a bioinformatician colleague to handle just this step, or switching to the Docker-based install instead, which avoids package compilation entirely.
8Open OmicsBridge in your browser
Once you see "Step 2/2: Launching OmicsBridge" and then Listening on http://127.0.0.1:4191, a browser tab should open automatically.
If it doesn't open by itself, go to http://localhost:4191 manually.
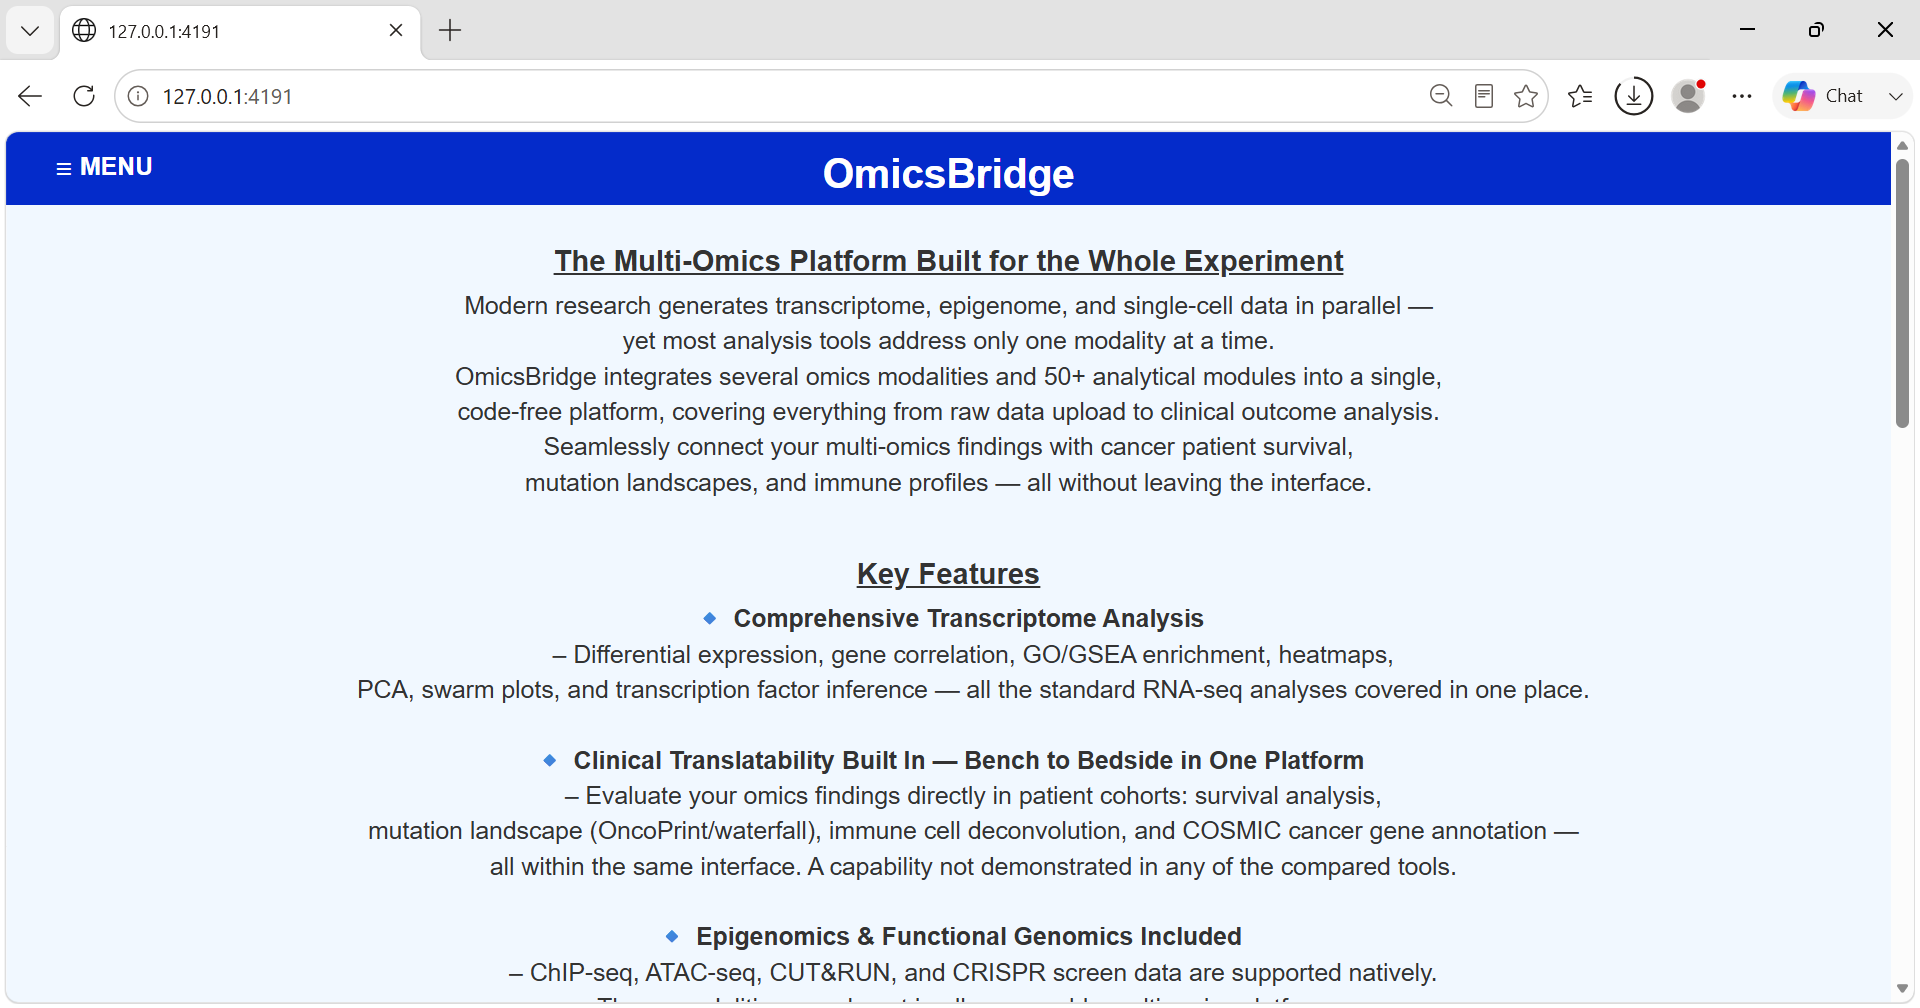
Keep the black window open — closing it stops OmicsBridge.
Next time
Just double-click launch_with_local_R.bat again — packages are already installed, so it skips straight to starting up (about 10–20 seconds).
Windows Docker Desktop
Everything below is specific to this path — just follow along top to bottom.
What is Docker?
Docker Desktop lets you run OmicsBridge inside a self-contained "box" (called a container) that already has R and every package it needs pre-installed and tested — you never install R or any package yourself.
Trade-off
A bigger one-time download (a few GB) to fetch that pre-built box.
Benefit
Zero package installation, zero chance of a package failing to compile on your machine.
Good if you'd simply rather not deal with R packages at all.
1Install WSL2
Docker Desktop for Windows runs on top of WSL2 (Windows Subsystem for Linux), which needs to be installed first.
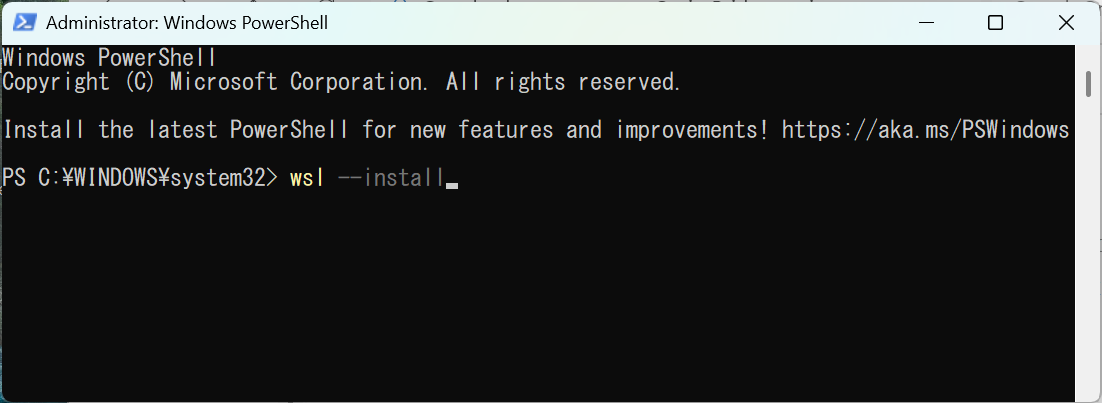
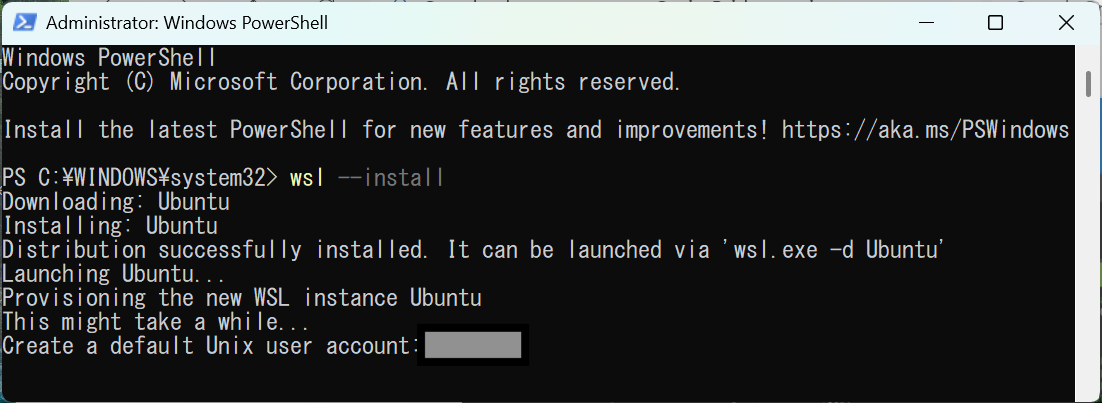
- Click Start, type PowerShell, then right-click it → Run as administrator → confirm the "Yes" prompt
- Check the title bar says "Administrator: Windows PowerShell"
- Run:
wsl --install, and wait for it to download and set up Ubuntu — this can take a few minutes - Partway through (or, on some PCs, after a restart it asks for), you'll be asked to create a UNIX username and password. This is just for the Linux environment inside WSL — not your Windows login. Pick anything you like (e.g. your first name), and note that the password won't show any characters as you type it. You won't need to remember or use these again for OmicsBridge itself.
- If it asks you to restart your PC, do so — Ubuntu will then finish setting up on its own (or launch Ubuntu from the Start menu if it doesn't)
wsl --install fails with an elevation error even after "Run as administrator", or Docker Desktop later shows "Virtualisation support not detected", this is very likely IT policy on a managed laptop blocking virtualization — not something you can fix yourself. Either ask your IT department to enable virtualization + WSL2, or switch to the Windows + Your own R path instead — it needs no virtualization and usually no admin rights."Virtualisation support not detected" on a PC you do control? Hardware virtualization (Intel VT-x / AMD-V) needs enabling in the BIOS/UEFI — restart, enter BIOS setup (often F2/F10/Del at boot), enable it under CPU/Advanced/Security settings, save and reboot.
2Install Docker Desktop
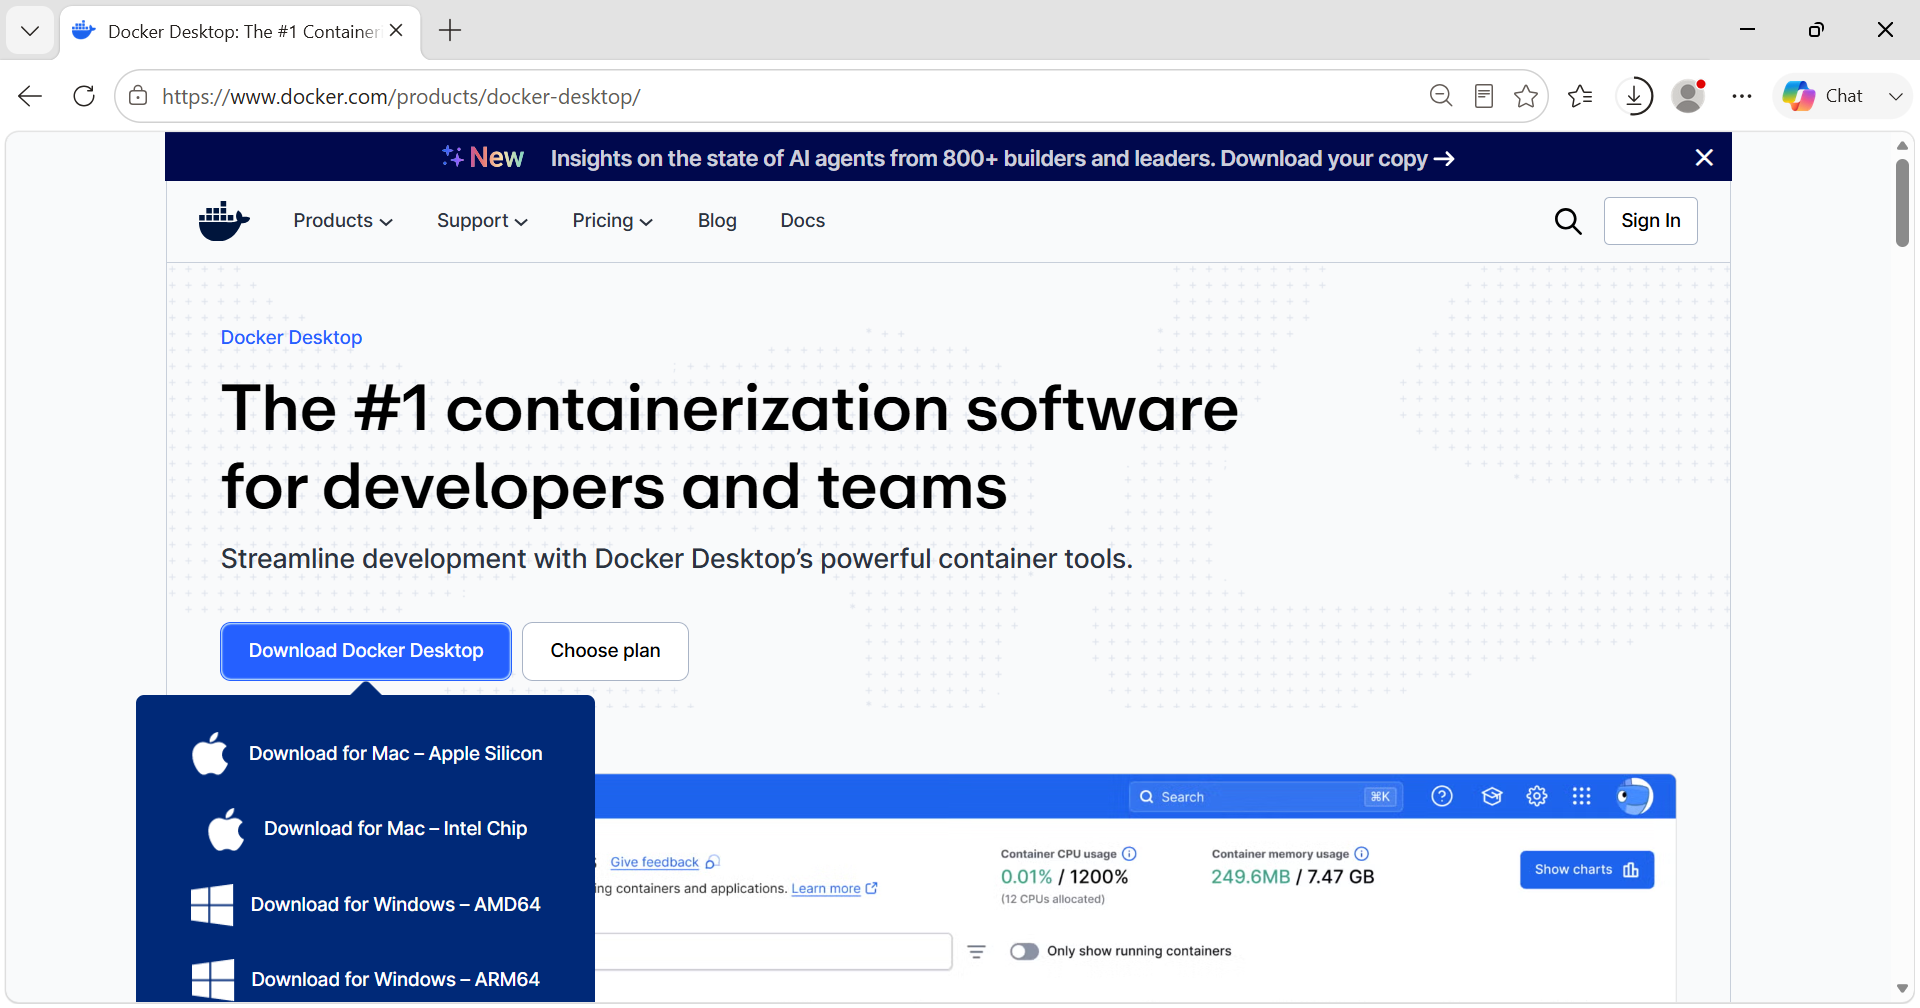
Go to docker.com/products/docker-desktop and download the Windows installer.
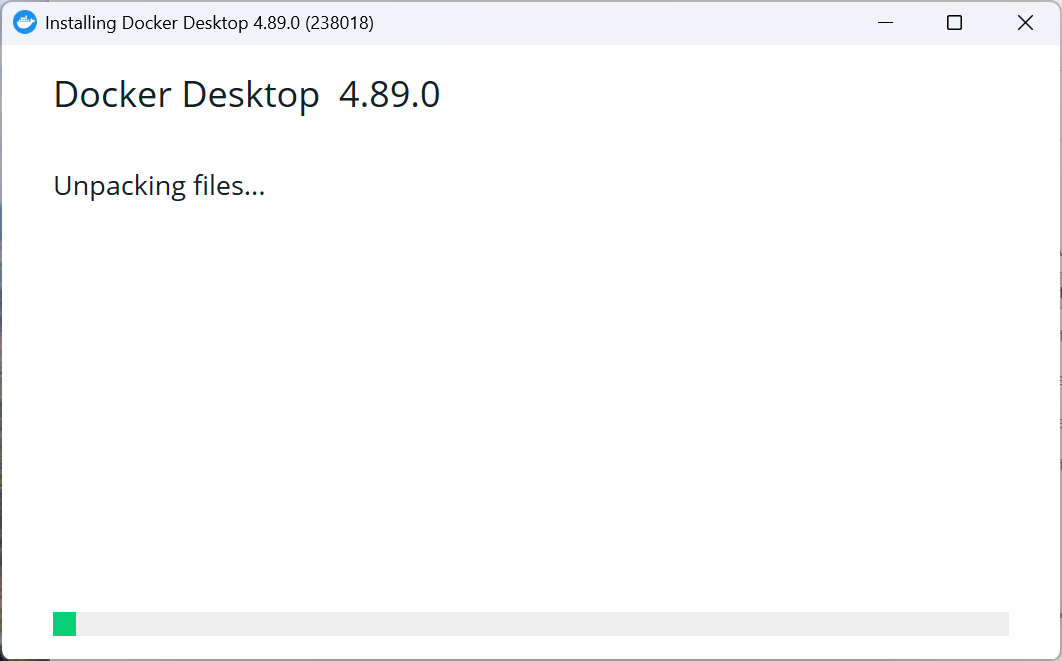
Run the installer and follow the on-screen steps.
If asked to choose "System (per-machine)" vs "Per-user install" — pick System if you have admin rights on this PC (the safer default). No admin rights (e.g. an institute-managed laptop)? Choose Per-user instead — no admin password needed.
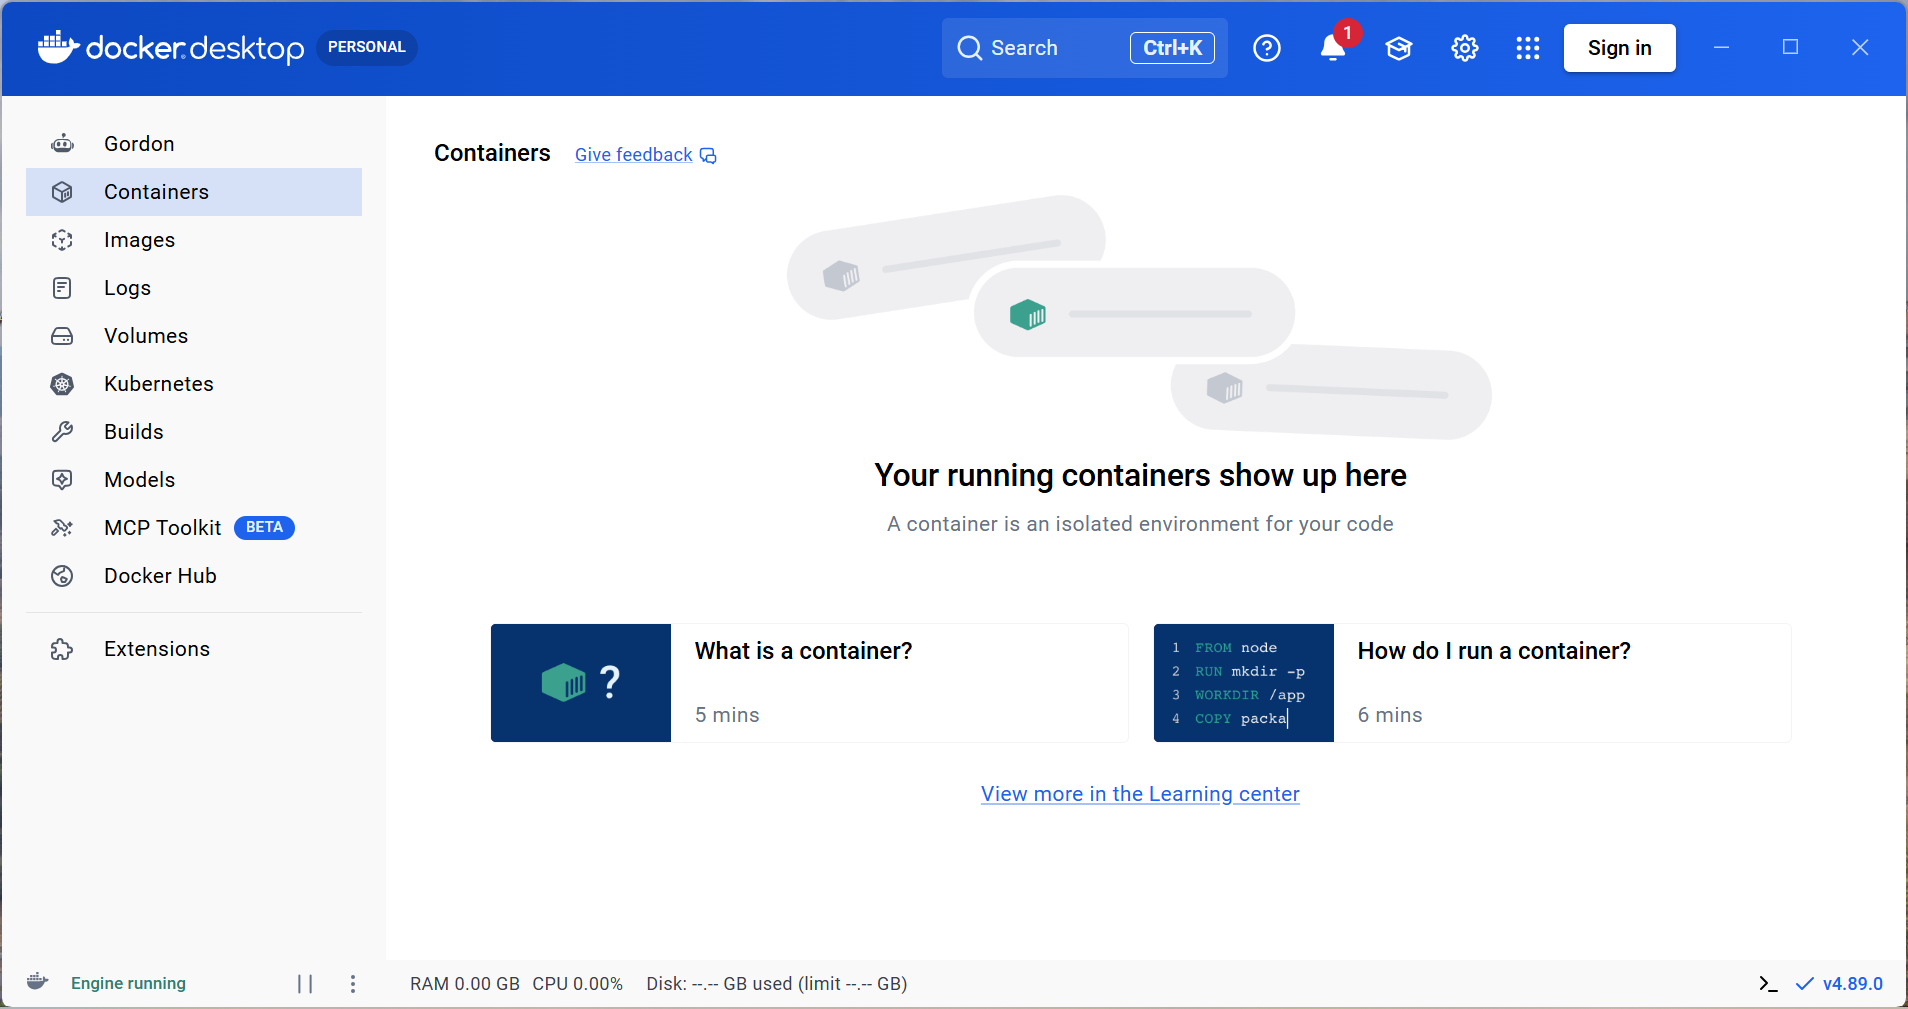
3Confirm Docker is running
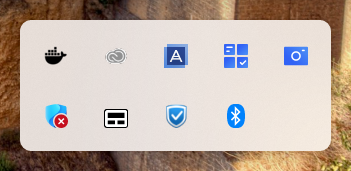
Look for the little whale icon in the bottom-right system tray. Leave Docker Desktop running in the background for every step that follows.
If asked to sign in, look for a line saying "You do not have to log in or create an account" — signing in isn't required.
Memory limit: Windows (WSL2) defaults to about 8 GB of RAM for containers, regardless of how much your PC has. Large analyses may need more — increase it under Docker Desktop → Settings → Resources → Memory (or edit .wslconfig) if things run out of memory.
4Get the OmicsBridge files
Go to github.com/htsmto/OmicsBridge, click the green Code button → Download ZIP.
Right-click the downloaded ZIP → Extract All... → choose a destination (e.g. Desktop) → Extract.
The extracted folder is named OmicsBridge-main (not just OmicsBridge) — that's fine, no need to rename it. This guide just calls it "the OmicsBridge folder."
5Download the data
Go to the Zenodo page and download:
00_Clinical_dataset.tar.gz— curated TCGA data, required00_Expression_data_all.tar.gz— demo data, optional
00_Expression_data_all.tar.gz is demo data only, and it's large. OmicsBridge runs fine without it — skip it now and come back for it later if you want the full demo.
6Unzip the data into the OmicsBridge folder
Move the downloaded .tar.gz file(s) into the OmicsBridge folder, then right-click each one → Extract All... → Extract.
Watch out: Windows' "Extract All" suggests a destination folder with the same name as the archive. If you accept that default, you'll end up with a doubled-up folder like 00_Clinical_dataset\00_Clinical_dataset\.... Before clicking Extract, edit the destination path to remove that extra trailing folder name, so the data lands directly in OmicsBridge\00_Clinical_dataset\....
Already got the doubled folder? Open the inner 00_Clinical_dataset folder, select all its contents, cut, go up one level, paste, then delete the now-empty inner folder.
Example: here OmicsBridge-main sits inside a folder called Folder for OmicsBridge on the Desktop. Extracting 00_Clinical_dataset.tar.gz (and optionally 00_Expression_data_all.tar.gz) directly into OmicsBridge-main — alongside app.R and the launcher files — turns the folder on the left into the one on the right.
7Launch OmicsBridge
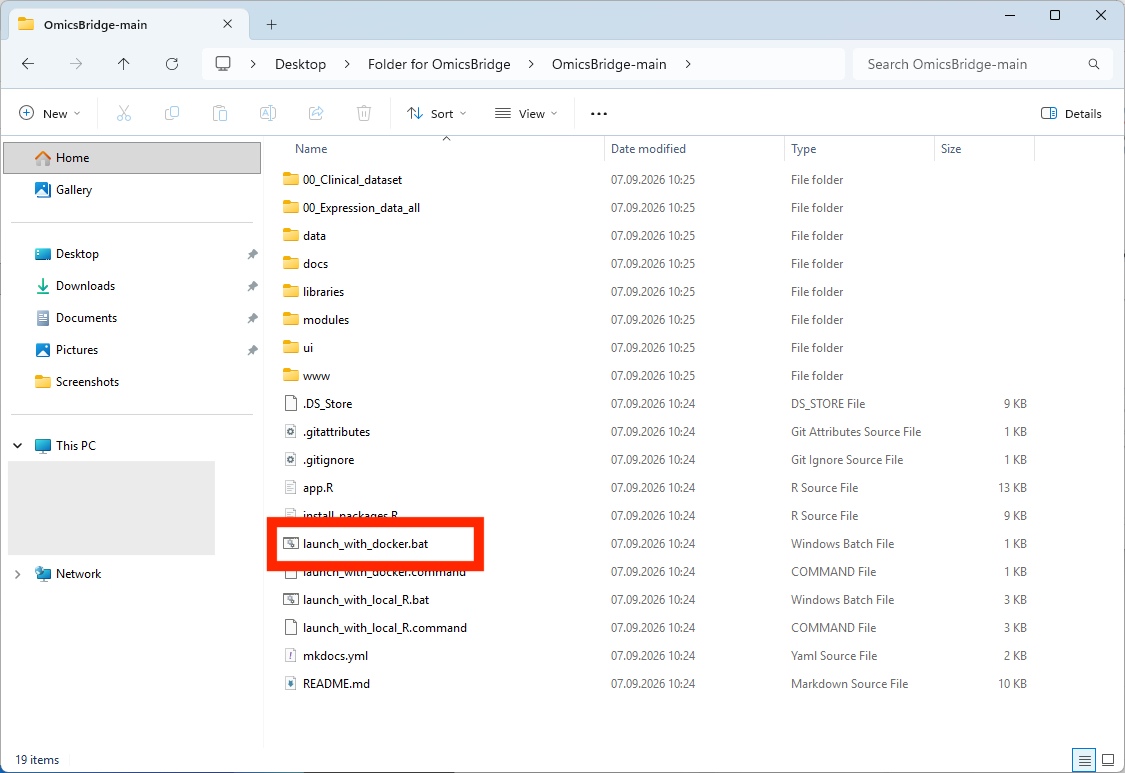
In the OmicsBridge folder, double-click launch_with_docker.bat.
You'll likely see a blue "Windows protected your PC" screen (SmartScreen, since the script is unsigned). Click More info → Run anyway. You only need to do this once.
8First run: downloading the app image
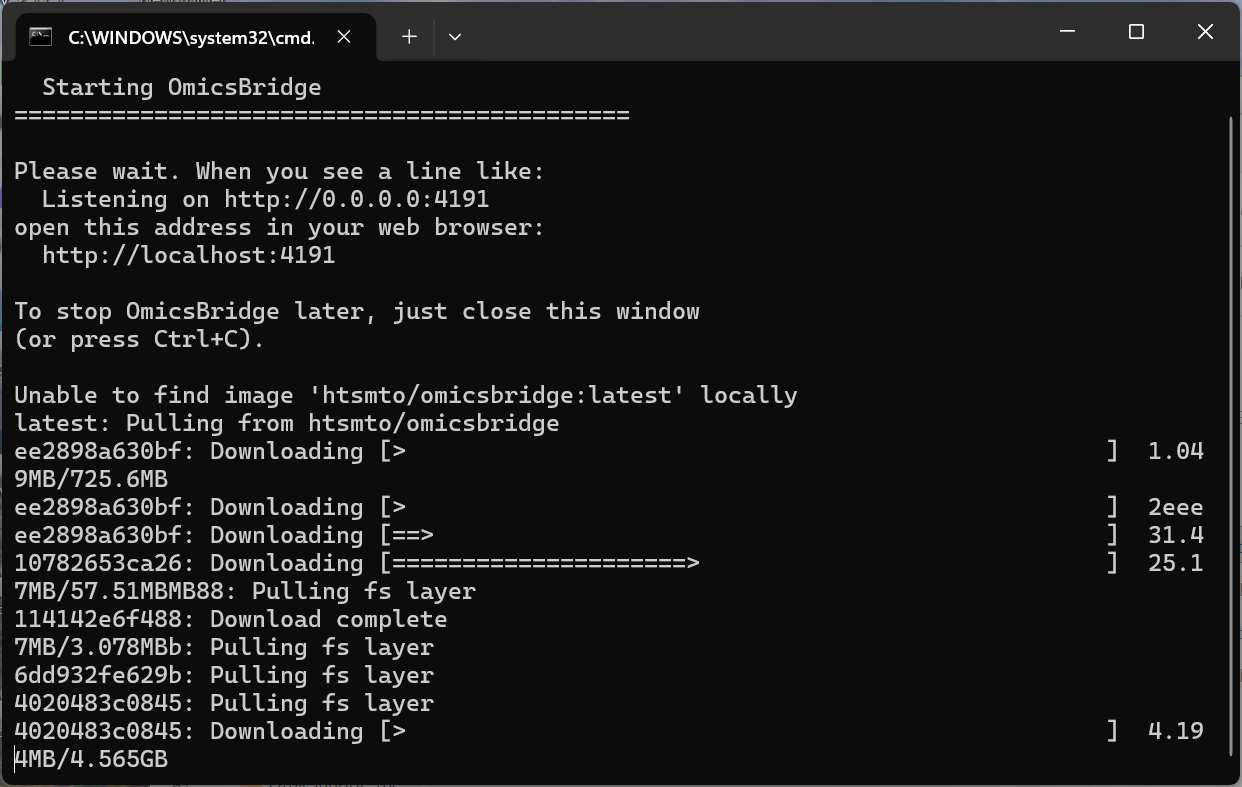
A black window opens. The first time only, Docker downloads the OmicsBridge image (a few GB) before starting it — this can take several minutes depending on your connection. Leave it running.
Every launch after this one skips straight to starting up.
9Open OmicsBridge in your browser
Once you see a line like Listening on http://0.0.0.0:4191, open http://localhost:4191 in your browser.
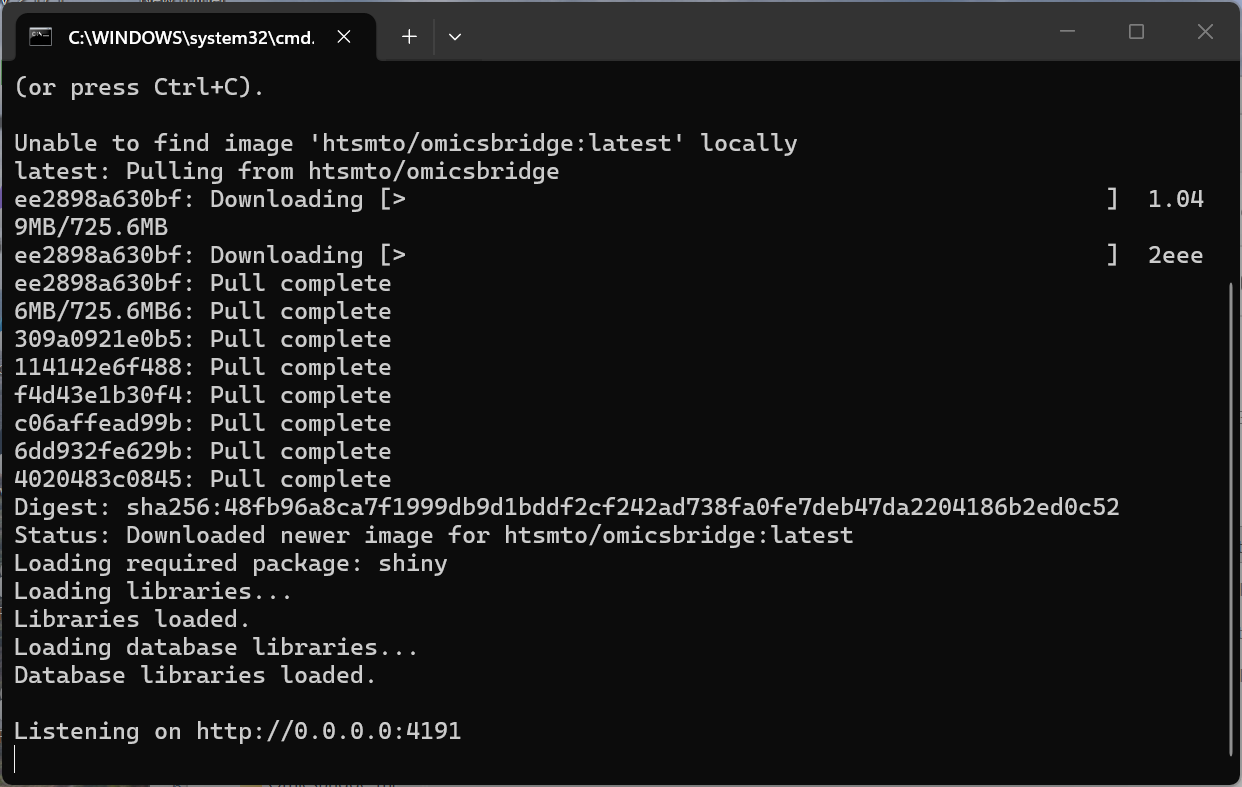
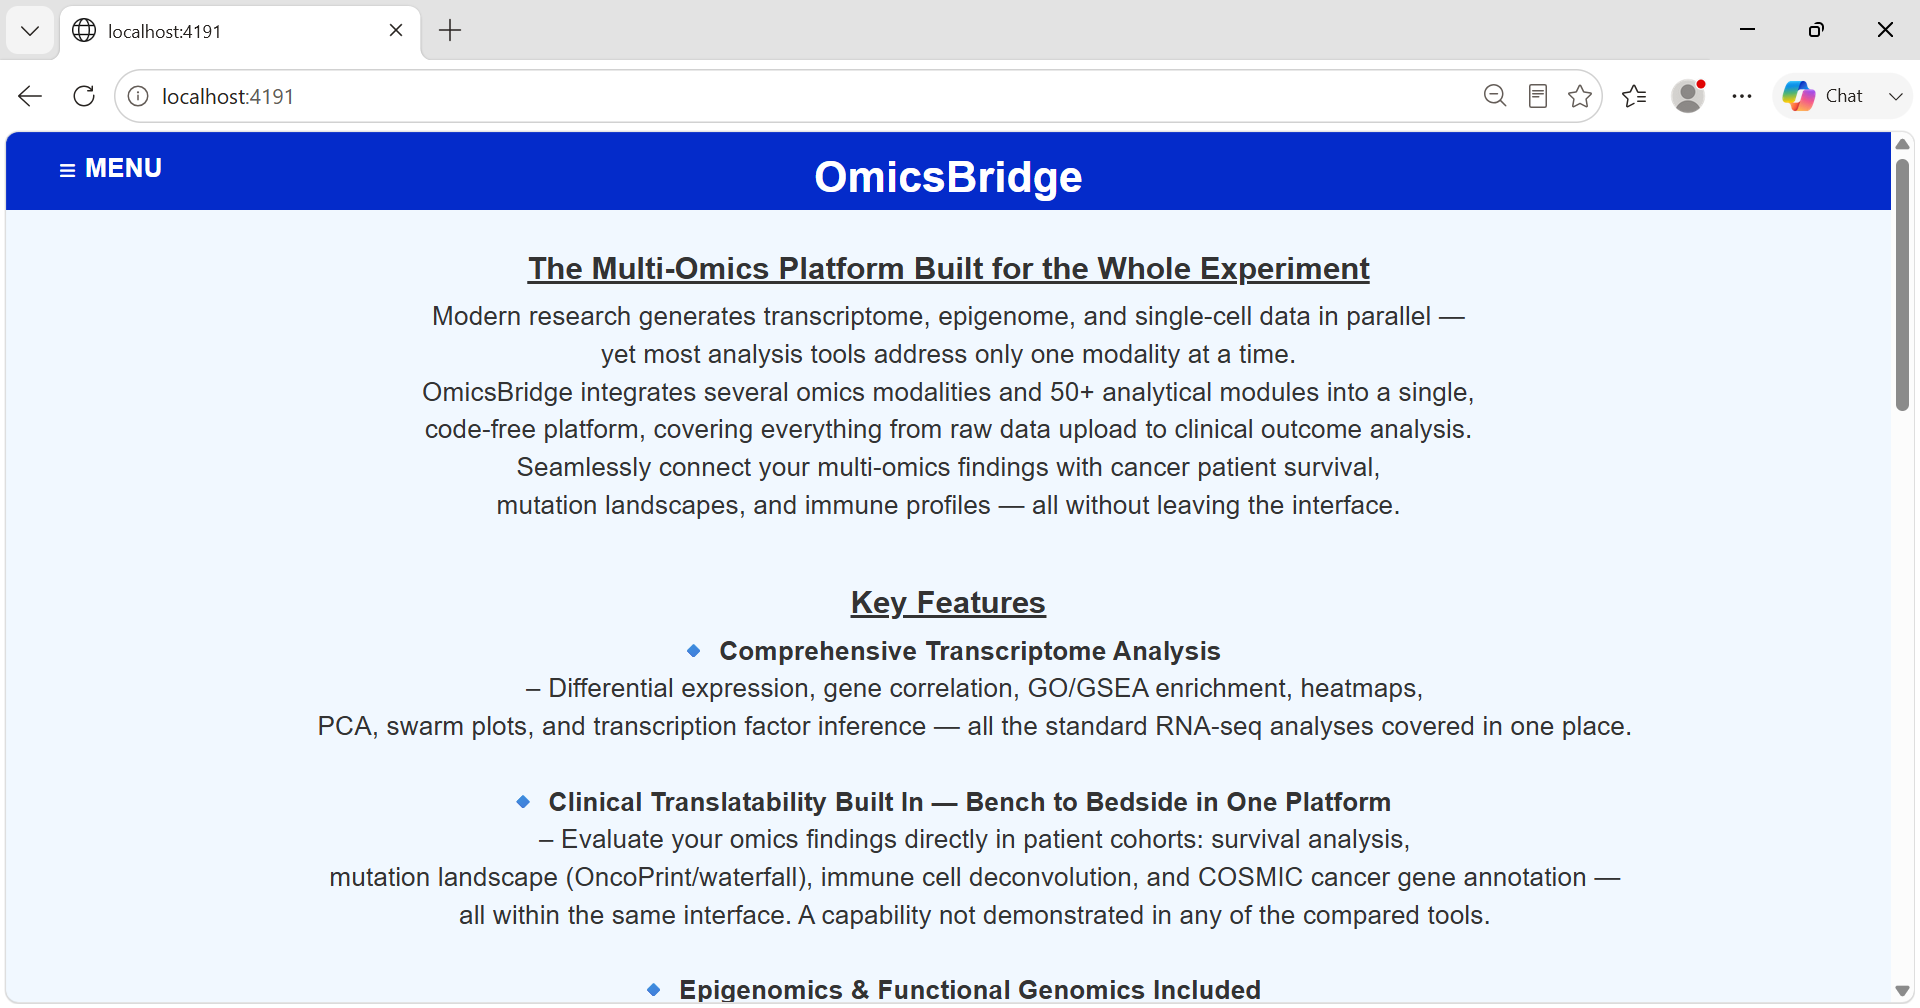
Keep the black window open — closing it stops OmicsBridge.
Next time
Just double-click launch_with_docker.bat again — the image is already on your computer, so it skips straight to starting up.
FAQ
Troubleshooting
"Port already in use"
Another program is using port 4191. Open your launch_with_... file in a plain text editor, change every 4191 to a free port such as 4192, save, and run it again — then open http://localhost:4192.
Nothing loads in the browser, even after waiting
Fully quit Docker Desktop (not just close its window) and reopen it, then run the launcher again. If a port genuinely refuses to work no matter what, try a different port number (see above) — some numbers can get "stuck" after many restarts during testing.
A package fails to install / fails to compile (R paths)
This is almost always a missing compiler toolchain. Double check:
- Mac: Xcode Command Line Tools were installed (
xcode-select --install) - Windows: Rtools is installed and matches your R version
Then double-click the launcher again to retry — it re-runs install_packages.R automatically since the marker file wasn't created yet.
Bioconductor version mismatch (R paths)
Make sure BiocManager is version 3.20 or higher:
BiocManager::install(version = "3.20")Running on a remote server instead of your own computer?
This guide assumes you'll open the browser on the same machine. For a remote server (e.g. over SSH with no desktop to double-click from), forward the port first:
ssh -L 4191:localhost:4191 your_username@remote_server_addressThen run the equivalent manual command on the remote server, and open http://localhost:4191 in your local browser. See the README for the exact manual commands.
Still stuck?
Open an issue on GitHub Issues, or contact:
Hitoshi Matsuo
German Cancer Research Center (DKFZ) Heidelberg
hitoshi.matsuo[at]dkfz-heidelberg.de
You're all set
For a guided tour of each analysis module, see the
OmicsBridge Wiki — with short demo videos for every feature.